Taylor Swift’s Eras Tour has sparked an incredible wave of creative nail art that’s taking the beauty industry by storm. We’ve witnessed Swifties transform their fingertips into miniature masterpieces that celebrate each iconic era of Taylor’s musical journey.
From glittery Lover pastels to dark Reputation vibes and sparkling Midnights blues we’re seeing nail designs that perfectly capture the essence of every album. These aren’t just regular manicures – they’re wearable art pieces that let fans carry their favorite Taylor Swift era wherever they go.
Whether you’re heading to the concert or simply want to channel your inner Swiftie we’ve compiled the most stunning nail ideas that’ll make you feel like the main character in your own love story. Get ready to discover designs that range from subtle nods to bold statement nails that would make Taylor herself proud.
Fearless Era Nail Ideas: Golden Country Charm
The Fearless era brings us back to Taylor’s country roots with warm golden hues and charming details that capture the essence of her second studio album. We’re diving into nail designs that perfectly embody the sparkling optimism and romantic storytelling of this beloved era.
Sparkling Gold Glitter Tips
Gold glitter French tips transform the classic manicure into a Fearless era masterpiece that catches light beautifully. We recommend using fine gold glitter over a clear or nude base to create that subtle sparkle Taylor wore during her early country days. Chunky gold glitter works perfectly for accent nails when you want to make a bolder statement.
Ombre gold tips blend seamlessly from natural nail color to brilliant gold at the tips. We love how this technique mimics the golden hour lighting often featured in Fearless era photography. Textured gold foil can be pressed onto wet gold polish to create an authentic metallic finish that reflects the era’s warm aesthetic.
Sunflower Yellow Accent Nails
Bright sunflower yellow serves as the perfect accent color to represent the optimistic spirit of Fearless. We suggest painting one or two nails per hand in this cheerful shade while keeping the rest neutral or gold. Matte yellow finish offers a modern twist on the classic sunny color that pairs beautifully with gold accents.
Yellow floral designs can be hand painted or applied as decals to create intricate sunflower patterns. We’ve seen stunning results when artists combine yellow petals with brown centers and green leaves. Gradient yellow techniques let you blend from pale lemon to deep golden yellow across the nail surface.
Curly Script Font Details
Handwritten lyrics in gold or brown polish capture the storytelling essence of the Fearless era perfectly. We recommend choosing short phrases like “Love Story” or “Fearless” written in delicate cursive across accent nails. Thin nail art brushes work best for creating authentic looking script details.
Gold script initials “TS” or “13” can be painted in Taylor’s signature curly handwriting style. We love how these personal touches make each manicure feel custom and meaningful. Brown script details offer a more subtle approach while still maintaining that handwritten aesthetic the era is known for.
Speak Now Era Nail Ideas: Purple Enchantment

We’re diving into the magical industry of Speak Now with ethereal purple hues that capture the whimsical essence of Taylor’s third studio album. These enchanting designs bring fairy tale romance to your fingertips with sophisticated purple tones and dreamy accents.
Deep Purple Ombre Design
Deep purple ombre creates a sophisticated gradient that perfectly embodies the Speak Now era’s mystical atmosphere. We recommend starting with a rich plum base at the cuticle and gradually blending into lighter lavender shades toward the tips. This technique requires patience but delivers stunning results that mirror the album’s emotional depth.
Professional nail artists suggest using at least three purple shades to achieve the smoothest transition. You’ll want to work quickly while the polish remains wet to create seamless blending between colors. The finished look captures both elegance and whimsy that defines this beloved era.
Sparkly Lavender Base Coats
Sparkly lavender base coats add that essential touch of magic we associate with Speak Now’s enchanted themes. These glittery finishes work beautifully as standalone designs or as foundations for more elaborate nail art. We love how the shimmer catches light during concerts and creates that perfect Instagram worthy sparkle.
Fine glitter particles in silver or holographic finishes complement lavender polish exceptionally well. You can layer multiple coats for maximum sparkle or keep it subtle with just one application. This versatile approach lets you customize the intensity based on your personal style preferences.
Fairy Tale Crown Decals
Fairy tale crown decals transform ordinary purple manicures into royal masterpieces worthy of the Speak Now storytelling tradition. We find these delicate decals work best when applied over solid purple bases or gradient designs. The crowns echo the album’s themes of princesses, castles, and happily ever after moments.
These decals come in various sizes and metallic finishes including gold, silver, and rose gold options. Placement matters significantly for the overall effect, with accent nails typically showcasing the largest crown designs. Sealing with a quality top coat ensures your fairy tale manicure lasts through multiple concert experiences.
Red Era Nail Ideas: Bold Crimson Statements

We’re diving into one of Taylor’s most passionate eras with striking red nail designs that capture the intense emotions and bold aesthetic of her “Red” album.
Classic Red Lips Nail Art
We love recreating Taylor’s signature red lip look directly on our nails for an iconic statement piece. Apply a vibrant crimson polish as your base coat, then use a thin nail art brush to paint small lip shapes on your ring fingers or thumbs. Add a touch of clear gloss over the lip designs to create that authentic shiny effect that mimics Taylor’s classic red lipstick. Complete the look by painting the remaining nails in the same bold red shade, ensuring your manicure screams “Red” era confidence from every angle.
Heart-Shaped Accent Designs
We’re incorporating romantic heart motifs that perfectly capture the love struck essence of Taylor’s “Red” period. Start with a deep crimson base on all nails, then use a contrasting white or gold polish to paint small hearts on your accent nails. Create varying heart sizes across your nails using dotting tools or nail art brushes for added visual interest. Place these heart accents strategically near your cuticles or nail tips to frame your crimson base beautifully. Consider using red rhinestones shaped like hearts for a three dimensional effect that catches concert lights perfectly.
Matte Red with Glossy Tips
We’re achieving stunning contrast by combining different finishes that add sophisticated depth to our Red era manicure. Apply two coats of matte red polish to create that velvety texture Taylor often embraced during this period. Paint glossy clear coat or matching red polish on just the tips of your nails, creating a modern twist on the classic French manicure. Allow the matte base to dry completely before adding the glossy tips to prevent any unwanted blending. Finish with a thin layer of top coat only on the glossy sections to maintain the beautiful contrast between textures.
1989 Era Nail Ideas: Pastel Pop Perfection

We’re diving into the dreamy pastel industry of Taylor’s fifth studio album with nail designs that capture the breezy, pop-perfect essence of this groundbreaking era.
Seagull Silhouette Designs
Seagull silhouettes bring an urban industry feel to your nails, perfectly complementing the metropolitan vibe of the 1989 album. We recommend starting with a soft sky blue base coat that mimics the cloudy atmosphere featured on the album cover. Small black seagull shapes painted across one or two accent nails create a whimsical touch that evokes city skylines and freedom.
These minimalist bird designs work beautifully when paired with white polish on remaining nails, creating a cohesive look that’s both sophisticated and playful. Artists often position the seagulls at different angles to simulate natural flight patterns, making each manicure unique and eye-catching.
Polaroid Picture Nail Art
Polaroid picture nail art combines nostalgic photography elements with the iconic red lips that defined Taylor’s 1989 aesthetic. We start with a glittery black polish base that serves as the perfect backdrop for white polaroid frames painted on accent nails. Classic red lip shapes get carefully placed within these miniature photo frames, creating an instantly recognizable homage to the era.
This design captures the album’s themes of capturing moments and memories while maintaining the pop culture references that made 1989 so distinctive. We suggest using a fine nail art brush to outline the polaroid squares with white polish, then filling in small red lip details using a dotting tool for precision.
Cotton Candy Pink Gradients
Cotton candy pink gradients evoke the sweet, pop culture atmosphere that defined Taylor’s transition into mainstream pop music. We create these dreamy effects by blending soft pink shades from lightest at the cuticle to slightly deeper tones at the nail tips. The gradient technique works best when using at least three different pink tones to achieve that seamless cotton candy appearance.
These pastel transitions perfectly embody the optimistic energy of songs like “Shake It Off” and “Blank Space,” giving your nails a soft, romantic finish that’s both trendy and timeless. We recommend using makeup sponges to dab and blend the colors while the polish is still wet, creating that perfect cloudy gradient effect that mirrors fluffy cotton candy textures.
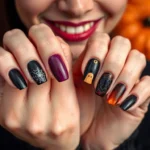
Reputation Era Nail Ideas: Dark and Edgy

Stepping into Taylor’s most rebellious chapter, we’re embracing the dark glamour that defines her sixth studio album. These striking designs capture the fierce energy and dramatic aesthetic that made Reputation era unforgettable.
Black Snake-Inspired Patterns
Snake motifs dominate this era’s nail art, reflecting the powerful symbolism Taylor reclaimed during this groundbreaking period. We recommend starting with a deep black base coat and adding intricate snake silhouettes using silver or emerald green polish for contrast. Skilled nail artists often incorporate small rhinestones or gems along the snake’s body to create texture and dimension.
3D snake elements elevate these designs from simple patterns to statement pieces. Consider adding tiny metallic snake charms or using nail foil to create realistic scales that catch the light. Many Swifties choose to feature one prominent snake across their ring finger while keeping other nails solid black for balance.
Serpentine patterns work beautifully when painted diagonally across the nail bed, creating movement and visual interest. We’ve seen stunning versions where artists use matte black polish as the base and glossy accents for the snake details, adding depth through texture variation.
Silver Metallic Accent Lines
Metallic silver details add sophisticated edge to Reputation inspired manicures without overwhelming the dramatic black foundation. We suggest incorporating thin silver striping tape or nail art brushes to create clean geometric lines that complement the era’s sharp aesthetic.
Strategic placement of silver accents transforms simple black nails into architectural masterpieces. Consider adding silver lines along the cuticle area, creating negative space triangles, or drawing minimalist lightning bolt shapes that reference the album’s electric energy.
Chrome silver finishes provide modern luxury when applied as accent nails or gradient effects. We recommend using silver chrome powder over a black base on one or two nails while keeping others solid black for a balanced look that screams Reputation era sophistication.
Gothic Newspaper Print Designs
Newspaper print nails channel the media scrutiny that inspired much of the Reputation album’s content. We create these designs by applying a light gray base coat and using black stamping plates or water slide decals featuring vintage newspaper text and headlines.
Layering techniques produce authentic newspaper effects that capture the era’s themes of public perception and media narratives. Consider using a matte top coat over the newspaper design and adding glossy black accents or small text details for visual contrast.
Modern interpretations incorporate song lyrics from Reputation tracks, creating personalized newspaper style designs. We’ve seen artists use tiny brushes to hand write lyrics like “Look What You Made Me Do” in newspaper font styles, making each nail a unique piece of Taylor Swift inspired art.
Lover Era Nail Ideas: Pastel Rainbow Dreams

The Lover era brings us into Taylor’s most romantic and whimsical aesthetic, where soft pastels and dreamy designs create the perfect foundation for enchanting nail art. We’ll explore three stunning design concepts that capture the ethereal beauty and love-struck essence of this beloved album.
Butterfly Wing Patterns
Butterfly wing patterns transform your nails into delicate works of art that perfectly embody the Lover era’s magical atmosphere. We create these designs using detailed black outlines with colorful, translucent sections that mimic real butterfly wings. Pastel blues and purples work beautifully for this ethereal effect, giving your nails an otherworldly charm.
Start with a clear or nude base coat, then use a fine brush to outline butterfly wing shapes across each nail. Fill the outlined sections with translucent pastels like lavender, mint green, or soft pink. Add tiny dots of iridescent polish to simulate the natural sparkle found on butterfly wings. These intricate designs capture both the whimsical feeling of the Lover era and create stunning conversation pieces at any concert.
Heart-Shaped French Tips
Heart-shaped French tips offer a playful twist on the classic manicure that’s pure Lover era magic. We shape or paint the tip of each nail to form small hearts, typically using pink or red tones that align perfectly with the album’s romantic themes. This design works especially well with a nude or clear base that lets the heart shapes take center stage.
Create these tips by painting traditional French tips first, then using a small brush to curve the edges into heart shapes. Rose gold, coral pink, and classic red create the most striking effects against neutral bases. We recommend adding a glossy top coat to make the hearts pop and catch the light beautifully. The design feels both sophisticated and sweet, making it perfect for everyday wear or special occasions.
Tie-Dye Pastel Swirls
Tie-dye pastel swirls bring the free-spirited energy of the Lover album directly to your fingertips through artistic color blending. We create these swirling patterns using pastels like lavender, pink, and mint that blend seamlessly into dreamy, abstract designs. Each nail becomes a unique canvas that reflects the colorful and optimistic mood of Taylor’s fifth studio album.
Apply your lightest pastel shade as the base coat, then drop small amounts of complementary pastels onto the wet polish. Use a toothpick or fine brush to create swirling motions that blend the colors naturally. Work quickly while the polish remains workable to achieve the best blending effects. Finish with a clear top coat to seal the design and add shine that enhances the dreamy, watercolor-like appearance of your tie-dye creation.
Folklore Era Nail Ideas: Cottagecore Aesthetics

We’ll explore the enchanting industry of Folklore inspired nail art that captures the album’s natural and nostalgic essence. This era embraces cottagecore aesthetics with whimsical designs that connect us to nature’s beauty.
Pressed Flower Designs
Pressed flower nail art brings the delicate romance of Taylor’s Folklore era directly to your fingertips. We recommend applying real pressed flowers like daisies, baby’s breath, or tiny wildflowers on top of your base coat for an authentic cottagecore look. These floral motifs work beautifully when layered over neutral tones, creating depth and texture that mirrors the album’s woodland imagery.
Focus on using pressed flowers as accent pieces on one or two nails rather than covering all ten fingers. This approach creates a stunning focal point while maintaining the understated elegance that defines the Folklore aesthetic. We suggest sealing the flowers with a high quality top coat to preserve their delicate appearance and ensure longevity.
Earthy Brown Base Colors
Earthy brown base colors serve as the perfect foundation for Folklore era nail designs. We love using warm chocolate browns, soft taupe shades, and creamy beige tones that evoke the cozy cabin vibes from Taylor’s album imagery. These neutral base colors complement the natural elements you’ll add on top while maintaining the era’s gentle and organic theme.
Choose matte finishes for your brown base to enhance the handcrafted, rustic feel that makes Folklore nail art so distinctive. Glossy browns work well too, especially when you’re planning to add pressed flowers or leaf patterns that need a smooth surface for proper adhesion.
Delicate Leaf Patterns
Delicate leaf patterns capture the essence of Folklore’s connection to nature through subtle botanical artistry. We achieve these designs using fine detail brushes to create gentle vine patterns, tiny leaves, or branch silhouettes in soft green or cream accents. The key is keeping these patterns understated and organic looking rather than perfectly symmetrical.
Start with simple leaf shapes using a toothpick or dotting tool if you’re doing DIY application at home. Professional nail artists often use specialized stencils or freehand techniques to create more intricate vine patterns that wrap around the nail. These leaf motifs work particularly well when combined with pressed flowers, creating a cohesive woodland scene across your manicure.
Tiny star motifs can be scattered throughout your leaf patterns for added charm, reflecting the dreamy quality that makes Folklore era nail art so beloved among Swifties.
Evermore Era Nail Ideas: Mystical Forest Vibes

Transitioning from Folklore’s cottage aesthetics, the Evermore era beckons us deeper into enchanted woodlands where magic and mystery intertwine. We’ll explore nail designs that capture the album’s mystical forest atmosphere through rich greens, golden accents, and vintage elements.
Deep Forest Green Shades
Forest green gradients create the foundation for stunning Evermore-inspired manicures that transport you straight into Taylor’s mystical woodland area. We recommend starting with a deep emerald base coat, then blending lighter sage greens toward the tips for a natural gradient effect. Different shades like hunter green, moss green, and olive green work together to mimic sunlight filtering through dense forest canopies.
Creating this gradient requires at least three complementary green shades for the most seamless blend. We suggest applying the darkest shade at the base, medium tone in the center, and lightest green at the tips using a makeup sponge for smooth transitions. Gold accents along the cuticle line add luxurious touches that elevate the forest theme to match Evermore’s sophisticated aesthetic.
Golden Branch Accents
Golden branch designs transform simple green bases into elaborate forest scenes that capture Evermore’s natural mystique perfectly. We create these intricate patterns using fine nail art brushes or specialized nail art pens filled with metallic gold polish. Delicate branches can extend from the cuticle upward, mimicking bare winter trees that echo the album’s contemplative mood.
Branching patterns work best when we vary the thickness and direction of each line, creating organic shapes rather than uniform designs. We often add tiny golden leaves or berries along the branches using dotting tools for extra dimension. Nail art stickers featuring branch motifs offer an easier alternative while still achieving the sophisticated forest aesthetic that defines the Evermore era.
Vintage Lace Patterns
Vintage lace patterns in cream and white add whimsical touches that perfectly complement Evermore’s romantic storytelling themes. We apply these delicate designs over the forest green base using nail stamping plates or hand-painted techniques with fine brushes. Intricate lace motifs like florals, geometric patterns, and vintage scrollwork create an ethereal overlay that suggests hidden fairy tale elements.
White lace patterns contrast beautifully against deep green backgrounds, while cream tones offer subtler sophistication for everyday wear. We recommend focusing lace designs on accent nails rather than every finger to maintain visual balance. Matte top coats over the lace patterns create texture variations that enhance the vintage aesthetic, making each nail feel like a piece of antique fabric from Taylor’s mystical forest tales.
Midnights Era Nail Ideas: Celestial Midnight Magic

The Midnights era brings us into Taylor’s most introspective and mysterious phase, where darkness meets beauty in stunning celestial designs. We’re diving into nail art that captures the essence of late night thoughts and starlit skies.
Starry Night Sky Designs
Starry Night Sky Designs transport us into the dreamy industry of Taylor’s tenth studio album with enchanting celestial patterns. We recommend starting with deep navy or midnight blue base coats that serve as the perfect canvas for twinkling star details. Silver and gold glitter can be strategically placed across the nails to mimic constellations, while tiny rhinestones add that extra sparkle we love seeing under concert lights.
Creating depth becomes essential when we’re working with these astronomical designs. Layer different shades of purple and blue to achieve that realistic night sky gradient that transitions from deep space to lighter twilight hues. We suggest using a makeup sponge to blend the colors seamlessly, creating that ethereal atmosphere Taylor captures in songs like “Lavender Haze.”
Finishing touches can include small white dots painted with a fine brush or nail art pen to represent distant stars. We’ve found that adding a matte topcoat over the base colors and then applying glossy accents only to the stars creates a stunning contrast that makes the celestial elements pop.
Purple and Blue Galaxy Swirls
Purple and Blue Galaxy Swirls capture the cosmic energy of the Midnights era through mesmerizing color combinations. We create these designs by blending various shades of purple, from deep eggplant to soft lavender, with midnight blues and navy tones. The swirling technique involves using a small brush or toothpick to create organic, flowing patterns that mimic the movement of galaxies.
Blending techniques require patience and practice to achieve those professional looking results we’re after. We start by applying the darker base colors and then gradually add lighter shades, swirling them together while the polish is still wet. This creates those natural looking galaxy formations that seem to dance across our nails.
Metallic accents elevate these cosmic designs to the next level. We often add thin lines of silver or holographic polish to represent stardust and cosmic debris floating through space. These shimmering details catch the light beautifully and add that luxurious 3D effect that makes the manicure truly special.
Clock Face Accent Nails
Clock Face Accent Nails perfectly embody the time themed concept that runs throughout the Midnights album. We typically choose one or two nails per hand to feature detailed clock designs while keeping the remaining nails in complementary solid colors like deep purple or midnight blue. These accent pieces become conversation starters that fellow Swifties immediately recognize.
Design elements include Roman numerals positioned around the nail like a traditional clock face, with tiny hands pointing to midnight. We use fine nail art brushes or stamping techniques to create precise numbers and details. Gold or silver polish works beautifully for the clock elements against darker base colors, creating that vintage timepiece aesthetic.
Personalization options let us incorporate meaningful timestamps that connect to favorite Midnights songs or personal memories. Some fans choose to position the clock hands at exact times mentioned in lyrics, while others might reference the album’s release time. We can also add small star details around the clock face to tie in the celestial theme that defines this era.
Tortured Poets Department Era Nail Ideas: Literary Romance

We’re diving into the enchanting industry of literary romance with nail designs that capture the essence of tortured poets and timeless love stories. These sophisticated manicures blend vintage aesthetics with romantic elements to create truly unique nail art.
Vintage Typewriter Font
Vintage typewriter fonts transform your nails into miniature love letters straight from a bygone era. We recommend using a fine nail art brush to carefully paint tiny typewriter keys across your nail surface, creating the illusion of vintage manuscript pages. Letters like “T” and “S” can be strategically placed to represent Taylor Swift’s initials, while romantic words such as “love,” “poetry,” or “forever” add personal meaning to each design.
Creating authentic typewriter text requires steady hands and quality nail art brushes in sizes 00 or 000. We suggest practicing the letterforms on paper first before attempting them on your nails. Black or dark brown polish works best for this technique, applied over a cream or off white base to mimic aged paper. Small imperfections actually enhance the vintage typewriter aesthetic, so don’t worry about achieving perfect uniformity.
Sepia-Toned Color Palette
Sepia tones evoke the warm, nostalgic feeling of vintage photographs and aged book pages that perfectly complement the tortured poets theme. We love using warm browns, burnt oranges, and muted golds as base colors to create that authentic vintage atmosphere. These earthy shades remind us of old parchment, leather bound books, and faded photographs tucked between poetry collections.
Blending techniques work beautifully with sepia palettes, allowing you to create gradient effects that mimic the natural aging of paper. We recommend starting with a light cream base and gradually building up layers of warm brown tones toward the nail tips. Matte top coats enhance the vintage aesthetic by eliminating shine and creating that authentic aged paper texture. Bronze and copper metallic accents can be added sparingly to represent vintage ink or quill pen details.
Quill Pen Accent Details
Quill pen designs add the perfect literary touch to complete your tortured poets manicure aesthetic. We create these elegant feathery details using a combination of fine brushes and dotting tools to achieve realistic quill textures. The key lies in painting delicate lines that branch out from a central stem, mimicking the natural structure of bird feathers used in traditional writing instruments.
Positioning quill pens as accent nails creates visual interest without overwhelming the overall design. We suggest placing one quill design per hand, typically on the ring finger or thumb for maximum impact. Dark brown or black polish works best for the quill shaft, while lighter browns or golds can represent the feather details. Adding tiny ink blots or cursive flourishes around the quill creates the impression of active writing, bringing the literary romance theme to life across your entire manicure.
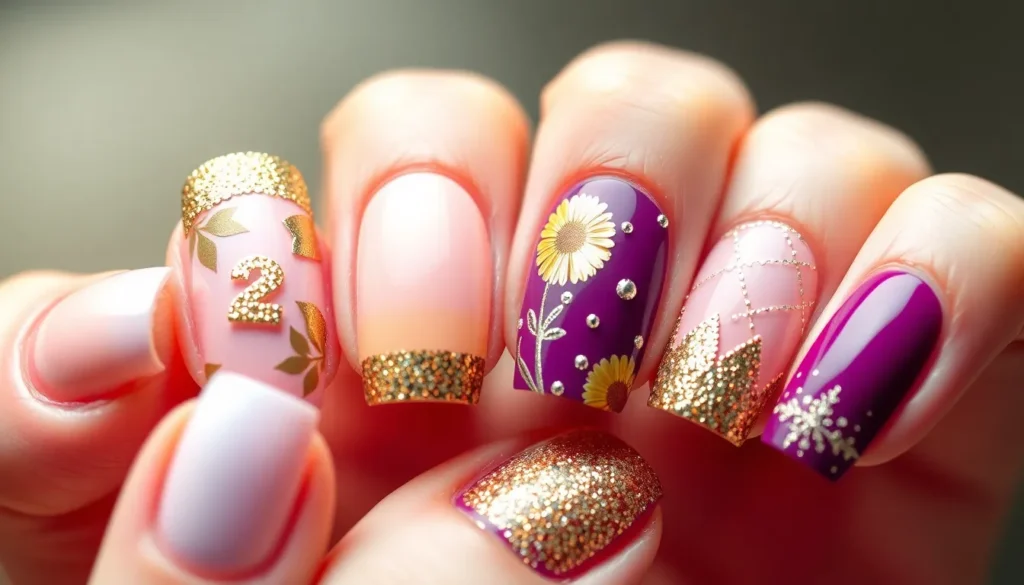
Multi-Era Mashup Nail Ideas: Ultimate Swiftie Style

We’re diving into the most creative approach to Taylor Swift nail art that celebrates her entire musical journey. These multi-era mashup designs allow us to showcase every album simultaneously, creating a stunning visual representation of Taylor’s artistic evolution.
Each Nail Represents Different Era
Assigning individual nails to exact albums creates the most striking mashup effect for devoted Swifties. We recommend choosing one iconic symbol per nail to represent each era: a purple heart for “Speak Now”, a red scarf fragment for “Red”, neon city lights for “1989”, a delicate mirrorball for “Folklore”, and celestial themes for “Midnights”.
Painting each nail with era-exact motifs ensures maximum visual impact across your entire manicure. We suggest incorporating butterflies from the “Lover” era on your ring finger while adding snake patterns from “Reputation” on your middle finger. Adding 3D elements like tiny rhinestones or metallic charms elevates each design beyond simple polish application.
Creating detailed artwork on individual nails allows for personal interpretation of favorite albums or songs. We find that using nail art brushes to paint tiny lyrics, album covers, or signature symbols makes each nail feel like a miniature masterpiece. Including chrome finishes and iridescent effects adds that sparkling Eras Tour concert atmosphere right to your fingertips.
Color-Blocked Era Themes
Bold single colors represent each era through strategic color blocking techniques that make a powerful statement. We choose deep purple for “Speak Now”, bright red for “Red”, soft pink for “Lover”, forest green for “Folklore”, and midnight blue for “Midnights” to create instant visual recognition.
Glossy and matte finishes provide texture variation while maintaining the color-blocked aesthetic across different nails. We recommend alternating between high-shine glossy blocks and sophisticated matte finishes to add depth and interest to the overall design.
Gradient effects within individual color blocks create seamless transitions that guide viewers through Taylor’s musical timeline. We blend from the earliest album colors to the most recent releases, using the Eras Tour’s signature color palette as our foundation for cohesive visual storytelling.
Timeline Gradient Designs
Chronological color progression transforms your nails into a visual timeline of Taylor’s artistic journey from country to pop to indie folk. We start with golden “Fearless” tones on the pinky finger and gradually transition through each era’s signature colors toward the thumb, creating a natural flow across the hand.
Blending techniques across all nails require careful color selection and application to achieve smooth transitions between eras. We use makeup sponges to dab and blend adjacent colors where different eras meet, ensuring the gradient feels intentional rather than accidental.
Subtle era markers within gradients allow us to maintain the timeline effect while adding recognizable elements from each album. We incorporate tiny glitter accents, metallic lines, or small decals at transition points to mark where one era flows into the next, creating a cohesive yet detailed homage to Taylor’s entire discography.
Conclusion
We’ve explored nail art designs that span Taylor’s entire musical journey from her country roots to her latest introspective works. These creative manicures offer Swifties the perfect way to showcase their dedication while adding personal flair to their concert-going experience.
Whether you’re drawn to the whimsical pastels of Lover or the dark mystique of Reputation your nails can become a canvas for musical storytelling. The beauty of these designs lies in their versatility – you can recreate them exactly or use our ideas as inspiration for your own artistic interpretation.
Your Taylor Swift-inspired manicure isn’t just nail art – it’s a celebration of the soundtrack to your life. So grab your favorite polish colors and start creating your own era-defining look that’ll have fellow Swifties asking where you got your nails done!
Frequently Asked Questions
What is Taylor Swift Eras Tour nail art?
Taylor Swift Eras Tour nail art is creative manicure designs inspired by each of Taylor’s musical eras. Fans, known as Swifties, transform their nails into artistic representations reflecting the themes, colors, and aesthetics of her different albums, from “Fearless” golden hues to “Midnights” celestial designs.
What are the best nail colors for the Fearless era?
The Fearless era is characterized by warm golden hues and sunny colors. Popular choices include sparkling gold glitter, ombre gold tips, and sunflower yellow accent nails. These colors capture the optimistic spirit of Taylor’s second studio album and can be enhanced with handwritten lyrics in gold or brown polish.
How do I create Speak Now era nail designs?
Speak Now era nails feature enchanting purple designs. Create deep purple ombre using at least three purple shades for a seamless blend, add sparkly lavender base coats for magical light reflection, and incorporate fairy tale crown decals to achieve the whimsical, royal aesthetic of this album.
What defines Red era nail art?
Red era nail art features bold crimson designs reflecting the album’s intense emotions. Popular styles include recreating Taylor’s signature red lip look on nails, romantic heart motifs with deep crimson bases and contrasting accents, and modern French manicures with matte red bases and glossy tips.
How can I achieve 1989 era pastel pop nails?
1989 era nails capture breezy pastel aesthetics with designs like seagull silhouettes on sky blue bases, Polaroid picture nail art combining nostalgic photography elements, and cotton candy pink gradients. These designs reflect the optimistic energy of hits like “Shake It Off” and “Blank Space.”
What makes Reputation era nails unique?
Reputation era nails are dark and edgy, featuring black snake-inspired patterns with silver or emerald accents, silver metallic geometric lines on dramatic black bases, and gothic newspaper print designs. These capture the fierce energy and media scrutiny themes of Taylor’s sixth studio album.
How do I create Lover era romantic nail designs?
Lover era nails embody romantic whimsy through butterfly wing patterns in pastel colors, heart-shaped French tips adding playful twists to classic manicures, and tie-dye pastel swirls. These designs capture the enchanting beauty and love-struck essence of the album’s aesthetic.
What characterizes Folklore era cottagecore nails?
Folklore era nails feature natural, nostalgic elements like pressed flower designs using real daisies and wildflowers over neutral bases, earthy brown colors evoking cozy cabin vibes, and delicate leaf patterns in soft greens. Tiny star motifs add extra woodland charm.
How do I create Evermore mystical forest nails?
Evermore nails feature deep forest green gradients mimicking sunlight through trees, golden branch designs, and vintage lace patterns. These intricate elements reflect the album’s romantic storytelling themes while enhancing the natural mystique of this era.
What are Midnights celestial nail ideas?
Midnights nails focus on celestial themes with starry night sky designs using deep navy bases adorned with silver and gold glitter, purple and blue galaxy swirls created through organic swirling techniques, and clock face accent nails incorporating time-themed designs for personal touches.
How can I create multi-era mashup nails?
Multi-era mashup nails celebrate Taylor’s entire journey by assigning individual nails to different albums using iconic symbols, employing color-blocking techniques for bold statements, and creating timeline gradient designs. This approach allows fans to honor Taylor’s complete discography in one cohesive manicure.
What supplies do I need for Taylor Swift nail art?
Essential supplies include various nail polish colors representing each era, nail art brushes for detailed work, glitter and rhinestones for sparkle effects, nail decals or stickers for complex designs, and top coat for protection. Specific tools like dotting tools help create precise patterns and details.