
Having small nails doesn’t mean you can’t rock stunning nail art that turns heads wherever you go. We’ve discovered that with the right techniques and designs, short nails can actually look more elegant and practical than their longer counterparts. The key lies in choosing simple yet impactful patterns that complement your nail shape rather than overwhelming it.
We’ll show you how to transform your petite nails into miniature masterpieces using easy-to-follow designs that require minimal tools and experience. From delicate geometric patterns to subtle color combinations, these simple nail art ideas prove that size doesn’t matter when it comes to style.
Whether you’re a complete beginner or someone who’s struggled with complex designs on small nails, we’ve curated foolproof techniques that’ll give you salon-worthy results at home. Get ready to discover how small nails can make the biggest statement with our collection of simple yet striking nail art ideas.
Simple Geometric Patterns That Maximize Small Nail Space
Geometric designs work exceptionally well on small nails because they create clean lines that make your nail beds appear longer and more defined.
Single Accent Lines
Vertical accent lines create the illusion of length on small nails. We recommend using a thin nail art brush or striping tape to draw a single straight line down the center of each nail. Choose contrasting colors like white lines on dark blue bases or gold lines on burgundy polish for maximum impact.
Horizontal lines across the nail bed add width and visual interest. Position these lines about one third from your cuticle or nail tip for the most flattering effect. Metallic shades like silver or rose gold work particularly well for this technique.
Diagonal accent lines offer a modern twist that elongates small nail space. Draw these lines from one corner to the opposite side using steady strokes. Start with your non dominant hand to practice the angle before moving to your dominant hand.
Minimalist Triangle Designs
Single triangles placed at the nail tip create a chic negative space effect. Use striping tape to mask off a small triangle shape then paint over it with your base color. Remove the tape while the polish is still wet for crisp edges.
Corner triangles maximize small nail real estate without overwhelming the design. Paint tiny triangles in the upper corners of your nails using a detail brush. Stick to two colors maximum to maintain the minimalist aesthetic.
Inverted triangles at the cuticle area draw attention upward and elongate the nail. Create these shapes using the tip of a bobby pin dipped in contrasting polish. Keep the triangles small and uniform across all nails for the best visual impact.
Tiny Dot Patterns
Single dots placed strategically create focal points without cluttering small nails. Use a dotting tool or the tip of a bobby pin to place three dots in a diagonal line across each nail. Space them evenly for a balanced look.
Micro polka dots add texture while maintaining simplicity on compact nail space. Create these using the smallest dotting tool available or a toothpick tip. Limit yourself to 5-7 dots per nail to avoid overcrowding.
Gradient dot patterns transition from large to small dots for visual movement. Start with a medium sized dot at the cuticle and decrease the size as you move toward the tip. This technique makes small nails appear longer while adding sophisticated detail.


Easy French Manicure Variations for Short Nails

French manicures remain one of the most versatile nail art options for small nails. We’ve found these variations create sophisticated looks that actually enhance shorter nail beds.
Classic Thin French Tips
Classic thin French tips offer the perfect starting point for small nail art. We recommend painting extremely thin white lines at the nail edge to create a clean, elongated appearance. The minimalist approach works because it enhances your natural nail shape without overwhelming the limited space.
Thin tips visually stretch short nails and maintain that polished, professional look we all love. We suggest using a fine brush or nail art pen to achieve the precise lines that make this style so effective. The understated elegance works for any occasion while keeping your manicure simple and manageable.
Colored French Tip Alternatives
Colored French tips transform the traditional look into something uniquely yours. We love experimenting with vibrant reds, soft pastels, and rich berry tones instead of classic white. These alternative colors brighten small nails and add personality without requiring complex techniques.
Double tip combinations create subtle yet stylish impact by pairing two similar shades. We recommend trying coral with peach or lavender with soft pink for a fresh twist on the classic design. The color variations give you endless possibilities while maintaining the simplicity that works best on shorter nails.
Reverse French Manicure
Reverse French manicures place the colored tip near your cuticle instead of the nail edge. We apply the accent color at the nail base to draw attention to the nail bed and create the illusion of length. This technique works beautifully because it makes small nails appear visually longer.
The reverse style suits both everyday wear and special occasions perfectly. We find this variation particularly effective with nude or creamy base colors that enhance the dainty look without making nails appear shorter. The simple application process makes it ideal for beginners who want salon quality results at home.

Quick One-Color Accent Nail Techniques

Single color accent techniques offer the perfect solution for creating stunning nail art on small nails without overwhelming their limited surface area. We’ll explore three powerful methods that transform your manicure with minimal effort and maximum impact.
Single Statement Nail
Choosing one nail to showcase a unique design creates visual interest while keeping your overall look balanced and sophisticated. Pick your ring finger or middle finger as the focal point and apply a bold color, shimmer polish, or small decorative element like a tiny floral pattern or geometric shape. We recommend keeping the remaining nine nails in neutral tones such as nude, soft pink, or clear polish to allow your statement nail to truly shine.
Transform your accent nail with simple additions like a single rhinestone, small decal, or hand painted dot pattern. This technique works exceptionally well for small nails because it concentrates attention on one area rather than competing for space across all fingers. The contrast between your neutral base nails and statement nail creates a professional yet playful appearance that’s perfect for both casual and formal occasions.
Gradient Fade Effects
Creating gradient effects on short nails requires precision and strategic color selection to maintain clarity within limited space. Start with a two tone gradient using colors from the same family, such as light pink fading to deep rose, to achieve the most polished results. We suggest using the scaled gradient technique, which involves masking portions of your nail to create distinct color zones that blend seamlessly.
Apply your lightest shade as the base coat across the entire nail, then use a makeup sponge to dab the darker color starting from the tip and working toward the middle. Blend the colors while the polish is still wet to create a smooth transition. Due to space constraints on small nails, limit your gradient to two colors maximum to prevent the design from appearing muddy or cluttered.
Metallic Accent Applications
Metallic polishes and foils provide instant glamour and reflect light beautifully on small nail surfaces. Focus metallic accents on exact areas like the nail tips, half moon near the cuticle, or a single vertical stripe down the center to create sophisticated contrast without overwhelming your nails. Gold, silver, and rose gold work particularly well as accent colors because they complement most base shades.
Apply metallic foil by painting a thin layer of foil adhesive on your desired area, waiting until it becomes tacky, then gently pressing the foil onto the nail and removing the backing. This technique creates a mirror like finish that appears more expensive than traditional metallic polish. We find that metallic accents on just one or two nails per hand creates the most elegant and balanced appearance for small nail beds.
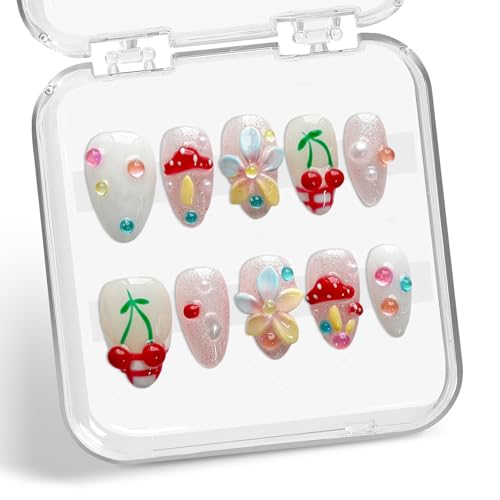
Effortless Floral Designs for Compact Nails

Floral motifs bring natural beauty to small nails when we adapt the scale and complexity to avoid overcrowding the limited surface area.
Simple Daisy Patterns
Creating daisy designs on small nails requires smaller dotting tools to achieve delicate petals and centers without overwhelming the nail surface. We recommend placing a single daisy or maximum two per nail to maintain that minimalist charm that works so well on compact nails. Keeping stem lengths shorter ensures the design fits proportionally without appearing cramped on your nail canvas.
Using white or yellow centers with simple petal dots around them creates an instantly recognizable daisy that’s both sweet and sophisticated. We find that positioning the daisy slightly off center adds visual interest while leaving breathing room around the design. This approach lets the floral element shine without competing for space on your small nail surface.
Tiny Rose Techniques
Miniature rose motifs work beautifully when we focus on just one or two roses per nail using compact brush strokes or tiny decals. This selective approach maintains the romantic floral aesthetic without overwhelming small nail surfaces. We suggest using smaller brushes or dotting tools to keep roses proportional and neat, which is absolutely essential for short nails.
Starting with a small center dot and adding curved lines around it creates a simple rose silhouette that’s perfect for beginners. We love how alternating between pink and red tones on different nails creates a cohesive look while adding subtle variety. The key is maintaining that delicate scale so each rose feels intentional rather than cramped.
Minimalist Leaf Accents
Leaves add subtle elegance as accent elements and work perfectly on short nails when we use fine lines and simple shapes. Strategic placement on one side of the nail or near the cuticle area creates beautiful balance without overwhelming the design. We find that using smaller tools and fewer pattern repetitions keeps the look clean and sophisticated for small nail surfaces.
Simple green strokes in various shades create realistic leaf textures that complement any floral design beautifully. We recommend practicing the basic leaf stroke on paper first to get comfortable with the motion before applying it to your nails. This minimalist approach lets you add natural elements that enhance rather than compete with your main design focus.
Basic Striping Tape Nail Art Methods

Striping tape transforms small nails into polished canvases with clean, precise lines that maximize your limited nail surface. We’ll explore three fundamental techniques that create stunning visual effects while keeping your designs beautifully simple.
Horizontal Stripe Patterns
Horizontal stripes create the illusion of wider nails by drawing the eye across your nail surface. We apply striping tape horizontally across each nail, spacing the lines evenly for a balanced appearance. This technique adds dimension to your nails without overwhelming them with complex designs.
The key to mastering horizontal stripes lies in proper tape placement. We recommend starting with one or two thin lines rather than multiple thick stripes to avoid crowding your small nail space. Press the tape firmly against your nail surface to prevent polish from bleeding underneath.
Color contrast enhances the horizontal stripe effect significantly. We suggest pairing neutral base colors with bold stripe accents, or using monochrome combinations for sophisticated results. Remove the tape while your topcoat is still slightly wet to achieve those crisp, clean edges.
Vertical Line Designs
Vertical lines elongate short nails by creating the visual impression of added length. We place striping tape vertically down the center or sides of each nail to achieve this slimming effect. This method works exceptionally well with contrasting colors that emphasize the vertical direction.
Single vertical lines prove most effective for small nails compared to multiple parallel stripes. We position one clean vertical line slightly off center to create asymmetrical interest while maintaining the lengthening effect. This placement prevents your nails from appearing too narrow or crowded.
Monochrome palettes enhance the sophisticated appearance of vertical line designs. We recommend using soft pinks, nudes, or classic black and white combinations that complement your nail’s natural shape. These color choices create elegant contrast without competing for attention on your compact nail surface.
Diagonal Crossing Techniques
Diagonal stripes add ever-changing movement to small nails through strategic angle placement. We create chevron patterns by crossing striping tape diagonally across your nail surface, forming V shapes that draw attention upward. This technique generates visual interest while maintaining the simplicity that works best on shorter nails.
Geometric shapes emerge naturally from diagonal crossing methods. We position tape at alternating angles to form triangles, diamonds, or abstract patterns that suit your personal style. These designs require minimal space while delivering maximum impact on your small nail canvas.
The crossing technique works beautifully with two tone color schemes. We apply a base color, place the diagonal tape, then paint over with a contrasting shade before removing the tape. This method creates sharp, professional looking geometric designs that appear complex but remain beginner friendly.
Simple Stamping Techniques for Small Nail Surfaces

Stamping offers one of the most effective ways to create intricate designs on small nails without requiring freehand painting skills. This technique enables precise pattern placement while maintaining the clean, polished look that works best on limited nail space.
Micro Pattern Stamps
Micro pattern stamps feature tiny, detailed designs that fit perfectly on small nail surfaces without overwhelming the space. These miniature motifs prevent overcrowding while delivering maximum visual impact through their intricate details. We recommend using fine tipped stampers to pick up and transfer these delicate patterns cleanly onto your nails.
Selecting stamping plates with smaller scale designs ensures each pattern maintains its clarity on short nails. The precision of micro patterns allows you to achieve professional looking results in just minutes, making this technique ideal for beginners who want complex designs without the complexity.
Partial Design Applications
Partial stamping involves selectively applying only exact sections of a full design to create minimalist or asymmetrical looks. This technique uses tacky putty or masking tools to isolate particular parts of the stamp pattern before transfer. We find this method particularly effective for maintaining sophistication while preventing small nails from appearing cluttered.
Creating partial applications allows you to customize any stamping plate design to fit your nail size perfectly. The selective approach ensures your nail art remains stylish and uncluttered, which is essential for achieving elegant results on compact nail surfaces.
Corner Accent Stamping
Corner accent stamping focuses design placement on just one corner or edge of the nail rather than covering the entire surface. This strategic positioning maximizes visual impact while keeping the overall look clean and sophisticated. We suggest using micro patterns or partial motifs to create these subtle detail placements that enhance rather than overwhelm small nails.
The corner placement technique adds a professional touch by emphasizing precise positioning over full coverage. This method works exceptionally well with geometric patterns, floral elements, or decorative borders that complement your nail’s natural shape while maintaining the minimalist aesthetic that suits small nails best.


Essential Tools and Supplies for Small Nail Art

Creating beautiful nail art on compact nail surfaces requires the right tools to achieve precise, professional-looking results. We’ll explore the must-have supplies that make all the difference when working with limited nail space.
Fine-Tip Brushes and Dotting Tools
Fine-tip brushes give us the precision we need for delicate designs on small nails. We can create tiny flowers, perfect dots, and intricate geometric shapes that enhance our limited nail space without overwhelming the overall look. These specialized tools allow us to paint minimal patterns that make our short nails appear more elegant and sophisticated.
Dotting tools complement fine-tip brushes perfectly for creating texture and visual interest. We use different sized dotting ends to produce varying dot patterns, from single statement dots to micro polka dot designs. The controlled application these tools provide ensures our patterns remain proportional to our nail size, preventing designs from appearing cluttered or oversized.
Professional nail artists recommend investing in multiple brush sizes to accommodate different design elements. We find that having brushes ranging from ultra-fine to medium tips gives us the versatility to tackle various art styles while maintaining the precision small nails demand.
Quality Base and Top Coats
Quality base coats protect our natural nails while creating a smooth canvas for our designs. We apply base coats to prevent staining and ensure our nail art adheres properly to the nail surface. This foundation step becomes especially important for small nails where any imperfections or chips become more noticeable due to the limited surface area.
Top coats seal our designs and extend the life of our nail art creations. We choose between glossy finishes for added shine or matte top coats for a contemporary, understated look. The protective barrier these coats provide prevents our carefully crafted small nail designs from chipping or fading prematurely.
Professional-grade base and top coats contain ingredients that strengthen nails and improve wear time. We notice that using quality coats makes our nail art last significantly longer, which is particularly valuable when we’ve invested time in detailed work on small nail surfaces.
Nail Art Tape and Stickers
Nail art tape simplifies creating straight lines and geometric shapes on our small nails. We use this tool to achieve crisp stripes, perfect triangles, and clean accent lines that would be difficult to paint freehand on limited nail space. The tape’s precision helps us maximize our small nail area while maintaining professional-looking results.
Stickers and decals offer instant patterns without requiring complex painting skills. We select designs specifically sized for small nails, such as tiny florals, minimal geometric shapes, or delicate accent patterns. These pre-made elements save time while ensuring our designs remain proportional and polished.
Removable stickers allow us to experiment with placement before committing to a final design. We can test different arrangements and color combinations on our small nails, ensuring the overall look remains balanced and visually appealing before applying top coat to secure our chosen design.
Quick Application Tips for Long-Lasting Results

Creating nail art that stays beautiful on small nails requires strategic techniques that maximize both durability and visual appeal. We’ll share proven methods that ensure your simple designs remain chip-free and stunning for days.
Proper Nail Preparation Steps
Clean your nails thoroughly to remove any oils and old polish that could interfere with adhesion. We recommend using a gentle nail dehydrator or rubbing alcohol to ensure the nail surface is completely clean.
Shape your nails gently with a high-quality file to prevent snagging and create a smooth edge. Filing in one direction rather than back and forth helps maintain nail strength and prevents micro-tears.
Buff the nail surface lightly to create an even texture that helps polish adhere better. We suggest using a fine-grit buffer to smooth out any ridges without thinning the nail plate.
Apply a base coat suitable for your nail type to protect the natural nail and create the perfect foundation. This crucial step prevents staining and significantly improves how long your nail art will last.
Thin Layer Application Methods
Apply polish in thin, even coats rather than thick layers to prevent chipping and ensure faster drying times. Thick coats tend to bubble and peel more easily on small nail surfaces.
Use a high-quality brush to maintain precise control when working on smaller nail areas. We find that brushes with shorter bristles offer better accuracy for detailed work on compact nails.
Keep polish away from the cuticles by painting close to the edges without flooding the skin. This technique prevents lifting and creates a cleaner, more professional appearance.
Choose fine brushes or dotting tools for creating delicate nail art details that fit perfectly within small nail spaces. These specialized tools help you achieve intricate designs without overwhelming the limited surface area.
Efficient Drying Techniques
Allow each layer to air dry for at least 1-2 minutes before applying the next coat to prevent smudging and ensure proper curing. Rushing this step often leads to dents and imperfections.
Use quick-dry topcoats or drying drops to speed up the overall process without compromising quality. These products can cut drying time in half while maintaining durability.
Apply cool air from a fan or blow dryer on low setting to help polish set faster without creating bubbles. We recommend keeping the airflow gentle to avoid disturbing the polish surface.
Avoid nail-intensive activities for at least 30 minutes after completing your manicure to prevent smudges and chips. This waiting period ensures your nail art has fully set and will last longer.

Conclusion
Small nails don’t mean small possibilities when it comes to creating beautiful nail art. We’ve shown you that with the right techniques and tools your petite nails can showcase designs just as stunning as any salon manicure.
The key lies in choosing patterns that complement your nail size rather than overwhelming it. Simple geometric shapes tiny dots and delicate accents work perfectly to enhance your natural nail shape while keeping maintenance minimal.
Remember that preparation is everything. When you take time to properly prep your nails and apply thin even layers you’re setting yourself up for designs that last longer and look more professional.
Your small nails are ready to make their statement. Start with one technique that appeals to you most and watch how these simple approaches transform your everyday manicure into something truly special.
Frequently Asked Questions
Can small nails really look as good as long nails with nail art?
Absolutely! Small nails can look elegant and sophisticated with the right designs. Simple, impactful patterns like geometric shapes, minimalist dots, and thin accent lines are perfect for shorter nails. The key is choosing designs that complement your nail shape rather than overwhelming the small surface area.
What are the best nail art designs for beginners with small nails?
Start with simple geometric patterns like single accent lines, minimalist triangles, or tiny dot designs. French manicure variations with thin tips or colorful alternatives are also beginner-friendly. These designs require minimal tools and experience while delivering stunning results that maximize your small nail space.
What tools do I need for nail art on small nails?
Essential tools include fine-tip brushes for precision, dotting tools for creating perfect circles, and striping tape for clean lines. You’ll also need quality base coat, nail polish, and top coat. These basic supplies are enough to create most designs recommended for small nails.
How can I make my nail art last longer on small nails?
Proper preparation is crucial – clean, shape, and buff your nails before application. Apply thin layers of polish to prevent chipping and ensure faster drying. Always use a base coat and top coat, and allow each layer to dry completely between applications for maximum durability.
What colors work best for small nail designs?
Both subtle and bold colors can work beautifully on small nails. For beginners, try neutral tones with metallic accents or classic French tips. Single-color accent nails or gradient fade effects also create stunning looks. The key is choosing colors that complement your skin tone and personal style.
How do I create geometric patterns on small nails?
Use striping tape to create clean lines and geometric shapes. Start with simple designs like single diagonal lines or small triangles. Remove the tape while the polish is slightly wet for crisp edges. Practice basic shapes before attempting more complex geometric patterns.
Are floral designs possible on small nails?
Yes! Opt for simple, minimalist floral designs rather than complex bouquets. Use dotting tools to create small flowers or fine brushes for delicate petals. Focus on one or two small blooms per nail rather than covering the entire surface to maintain elegance.
How long should I wait between coats when doing nail art?
Allow each layer to dry for 2-3 minutes before applying the next coat. Thin layers dry faster and create better results than thick applications. Use efficient drying techniques like cool air from a fan to speed up the process while maintaining quality.