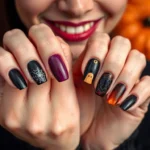
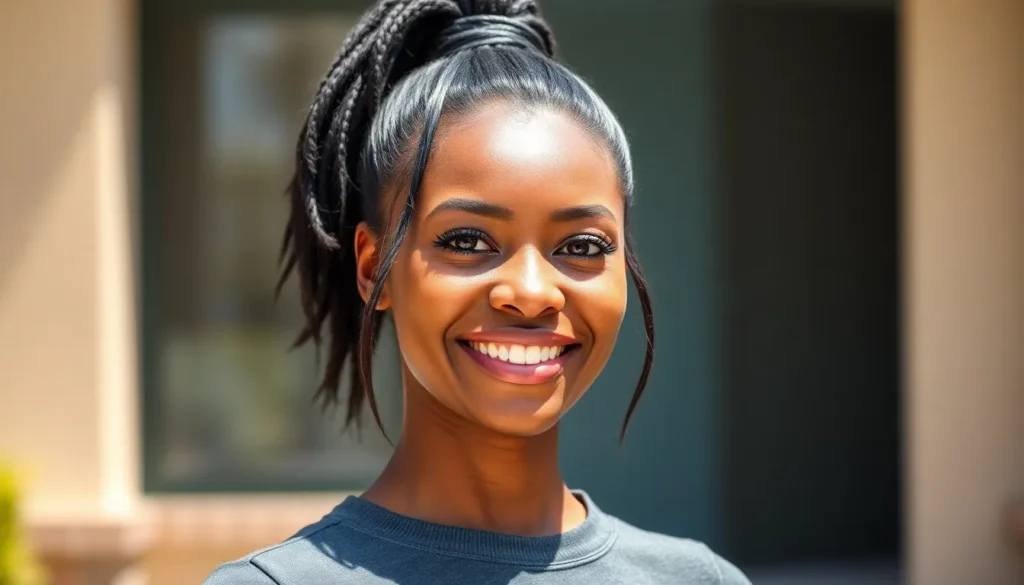
We’ve all been there – standing in front of the mirror trying to tame our hair into something spectacular. For Black women, gel has become the ultimate game-changer in creating stunning hairstyles that last all day while keeping our natural texture looking its absolute best.
Gel hairstyles aren’t just about slicking back edges (though we love a good baby hair moment). They’re about versatility, protection, and expressing our unique style. From sleek ponytails that scream sophistication to intricate finger waves that channel old Hollywood glamour, gel opens up a industry of possibilities for every hair type and length.
Whether you’re dealing with 4C coils that need extra hold or looser curls that crave definition, we’ll show you how to master gel techniques that actually work. Ready to transform your hair routine and discover styles that’ll have everyone asking for your secrets?
Sleek Ponytails That Command Attention
Ponytails offer the perfect canvas for showcasing gel’s groundbreaking power in Black hair styling. These elegant updos demonstrate how the right gel technique can elevate a simple ponytail into a stunning statement piece.
High Ponytail with Baby Hair Styling
Creating a high ponytail with baby hair styling requires precision and the right gel formula for maximum impact. Start by applying a strong-hold gel like Eco Styler or Got2b Glued to damp hair, working from roots to ends. Brush your hair straight back using a boar bristle brush, gathering it at the crown of your head for that dramatic height we’re after.
Secure the ponytail with a hair elastic that matches your hair color perfectly. Take a small section of hair from the ponytail and wrap it around the elastic to hide the band. Pin this wrapped section underneath the ponytail base using bobby pins that blend with your hair tone.
Style your baby hairs using a small amount of edge control gel and a fine-tooth comb or edge brush. Popular baby hair patterns include swoops, curls, and geometric designs that frame your face beautifully. Apply the gel sparingly to avoid flaking, then use your tool to create clean, defined edges that complement your facial features.
Low Bun Ponytail with Side Part
Low bun ponytails with side parts offer sophisticated elegance that works for both professional and formal settings. Begin by creating a deep side part using a rat-tail comb, then apply medium-hold gel to each section separately. This technique ensures your part stays crisp and defined throughout the day.
Smooth each side of your hair back toward the nape of your neck using a paddle brush. Gather the hair into a low ponytail at the base of your neck, securing it with an elastic band. The key here is maintaining tension while brushing to achieve that sleek, polished finish we want.
Transform the ponytail into a bun by twisting the hair and wrapping it around the elastic base. Secure the bun with bobby pins, tucking the ends under for a clean appearance. Apply a light mist of setting spray over the entire style to lock in the sleek texture and prevent flyaways.
Braided Ponytail Base for Extra Hold
Braided ponytail bases provide superior grip and longevity for styles that need to last all day or night. Start by sectioning your hair into three parts: two side sections and one back section. Apply gel generously to each section, ensuring even distribution from scalp to ends.
Create two tight Dutch braids along your hairline, starting from your temples and braiding toward the back. These braids should meet at the crown area where you’ll gather the remaining hair. The Dutch braid technique keeps the braids raised and visible, adding texture and visual interest to your final style.
Combine the braided sections with the loose back hair to form your ponytail base. Secure everything together with a strong elastic band, then proceed with your desired ponytail styling. This braided foundation prevents slipping and maintains the ponytail’s position even during active wear or humid conditions.

Protective Styles Enhanced with Gel Definition

Protective styles become even more versatile when we incorporate gel into our routine. Gel helps us define our natural texture while keeping our hair healthy and protected from environmental damage.
Twist Outs with Gel for Longer-Lasting Hold
Twist outs offer us incredible versatility for showcasing our natural curl pattern. We can achieve defined curls that last several days by applying gel to slightly damp hair before twisting. Start with sections that are about 1-2 inches wide and work the gel through each section from roots to ends.
Distribute the gel evenly using a wide-tooth comb or our fingers to ensure smooth coverage. We should focus on coating every strand to prevent frizz and create uniform curl definition. Allow the twists to air dry completely or use a hooded dryer on low heat to speed up the process.
Remove the twists gently by unraveling them in the opposite direction of how we created them. We’ll notice how the gel provides extra hold that extends our twist out’s lifespan while reducing frizz throughout the week.
Bantu Knot Outs with Edge Control
Bantu knot outs create beautiful textured looks that celebrate our natural hair pattern. We can elevate this classic protective style by using gel to lay down our edges for a sleeker finish. Begin by sectioning damp hair into small triangular or square parts across our scalp.
Apply gel to each section before twisting the hair tightly and wrapping it into a knot. We should secure each knot close to the scalp to create the distinctive spiral pattern. Pay special attention to our hairline where we can use an edge control gel or stronger hold gel to smooth baby hairs.
Create clean parts using a rat-tail comb and apply gel along the part lines for crisp definition. We can style our edges in small swirls or keep them laid flat for a more polished appearance. This technique not only protects our hair but also adds elegance with controlled edges that frame our face beautifully.
Braid Outs with Gel Sealing
Braid outs give us gorgeous wavy textures that work well for both casual and formal occasions. We can enhance this style by applying gel to seal the ends of our braids, which reduces frizz and adds shine to our finished look. Start with clean, slightly damp hair and section it into medium-sized portions.
Apply a small amount of gel to each section, focusing on the mid-lengths and ends rather than the roots. We should braid each section tightly and secure the ends with small elastic bands or bobby pins. The gel acts as a protective barrier that helps maintain moisture and prevents breakage in our braided styles.
Seal the braided ends by applying an extra drop of gel and smoothing it down with our fingers. We can sleep in these braids overnight and remove them the next morning for beautiful, defined waves. This sealing technique is particularly beneficial for maintaining the health of our hair while achieving stunning textured results.


Edge Control Masterpieces for Flawless Finishing

We’ve explored protective styles and versatile ponytails, but edge control truly sets apart polished gel hairstyles from amateur attempts. Mastering this technique transforms any style into a sophisticated statement piece.
Swooped Baby Hairs with Intricate Patterns
Swooped baby hairs create elegant focal points that frame your face beautifully. Apply a small amount of strong-hold gel to damp baby hairs using a fine-tooth comb or edge brush. Create curved, flowing patterns by gently sweeping the hairs in S-shaped motions along your hairline.
Practice makes perfect when developing your signature swooped designs. Start with simple curves before advancing to more complex patterns like hearts, swirls, or waves. The key lies in working with small sections at a time, ensuring each swoop maintains its shape throughout the day.
Timing matters significantly for achieving flawless swooped edges. Work quickly while the gel remains pliable, but don’t rush the precision required for clean lines. Professional stylists recommend practicing these techniques on weekends when you have extra time to perfect your create.
Laid Edges with Geometric Designs
Geometric edge designs offer modern sophistication that complements contemporary hairstyles perfectly. Use a rattail comb to create sharp, angular patterns along your hairline. Triangle shapes, zigzag lines, and diamond patterns provide striking visual interest that photographs beautifully.
Precision tools enhance your geometric creations significantly. Invest in quality edge brushes with different angles and sizes to achieve various geometric effects. A small flat brush works best for creating straight lines, while angled brushes help form perfect triangular shapes.
Symmetry creates the most polished geometric looks for formal occasions. Measure distances between patterns using the comb’s edge as a guide. Professional stylists suggest marking your desired pattern lightly with the comb before applying gel for consistent results across both sides of your head.
Natural Edge Styling for Everyday Wear
Natural edge styling provides effortless elegance for daily routines without appearing overdone. Apply gel sparingly to slightly damp edges, focusing on laying them down smoothly rather than creating elaborate patterns. This approach works perfectly for professional settings or casual outings.
Lightweight application prevents stiffness while maintaining all-day hold. Use your fingertips to gently smooth edges after applying gel, creating a natural flow that follows your hairline’s natural shape. The goal is enhancement rather than dramatic transformation.
Maintenance becomes minimal with natural edge styling techniques. Touch up areas throughout the day using a small brush or your fingers. This understated approach allows you to maintain polished edges without frequent reapplication, making it ideal for busy lifestyles.

Wash and Go Styles Perfected with Gel Application

Wash and go styles represent the ultimate celebration of natural texture with minimal manipulation. We’re diving into gel techniques that transform this beloved routine into a defined, long-lasting masterpiece.
Coil Definition for 4C Hair Textures
Apply gel to soaking wet hair for maximum coil definition on 4C textures. Working with freshly washed hair ensures the gel penetrates each strand effectively. We recommend using a high-hold gel to clump curls together while your hair maintains peak moisture levels.
Section your hair into small portions to prevent tangling during application. Starting from the back, work through quarter-sized sections using the praying hands method. Gently smooth the gel from root to tip without disturbing your natural coil pattern.
Scrunch upward to encourage coil formation and remove excess water. This technique helps your 4C hair form defined spirals while the gel sets the pattern. We’ve found that patience during this step dramatically improves the final result.
Allow hair to air dry completely before touching or fluffing. Disrupting the drying process breaks the gel cast and creates unwanted frizz. Once fully dry, gently scrunch out any crunchiness for soft, defined coils that last for days.
Curl Enhancement for 3C Hair Patterns
Start with a lightweight gel to enhance your 3C curls without weighing them down. These curl patterns naturally have more bounce, so we avoid heavy formulas that flatten the crown area. Apply the gel section by section using downward strokes to follow your curl direction.
Use a wide-tooth comb or denman brush to distribute product evenly. Working through small sections ensures every curl receives adequate coverage. We recommend combing from the ends upward to minimize breakage and maintain curl integrity.
Plop your hair in a microfiber towel for 15-20 minutes after application. This technique removes excess moisture while preserving curl formation. The gentle absorption prevents frizz while allowing your gel to create lasting definition.
Finish with light scrunching once your hair reaches 80% dryness. This timing allows the gel cast to form properly while maintaining volume at the roots. We’ve discovered this method creates bouncy, defined curls that feel soft to the touch.
Volume Boosting Techniques for Fine Hair
Choose a lightweight gel or curl activator specifically formulated for fine textures. Heavy products flatten fine hair instantly, so we prioritize formulas that add body without buildup. These products provide hold while maintaining natural movement and bounce.
Focus application on the root area for maximum lift and volume. Using your fingertips, massage the product into your scalp and through the first two inches of hair. This technique creates foundation support that keeps your style elevated throughout the day.
Flip your head upside down while scrunching to encourage root lift. Gravity works in your favor during this step, allowing fine strands to separate and gain height. We suggest holding this position for 30 seconds before returning upright.
Diffuse on low heat with a bowl attachment to maintain volume. High heat flattens fine hair, so we keep temperatures minimal while using the diffuser’s gentle airflow. Cup sections of hair in the diffuser bowl and hold for 10-15 seconds before moving to the next area.
Slicked Back Looks for Professional Settings

Professional environments demand hairstyles that project confidence and polish. Slicked back styles using gel deliver that clean, sophisticated finish we need for business settings and formal events.
Corporate-Ready Low Buns
Low buns create an elegant foundation for our professional wardrobe. We smooth hair back with gel and secure it into a low positioned knot at the nape of our neck. This understated style keeps hair away from our face during long workdays while maintaining a refined appearance.
Application starts with damp hair for optimal gel distribution. We work the product through from roots to ends using our palms to create a sleek surface. Hair pins and decorative accessories can enhance the sophistication level when appropriate for our workplace dress code.
Maintenance requires minimal effort throughout the day. We simply smooth any flyaways with a small amount of gel on our fingertips. The low positioning prevents the style from becoming too tight or causing headaches during extended wear periods.
Sleek Side-Swept Styles
Side swept looks add ever-changing movement while remaining office appropriate. We create a deep side part and slick hair down with gel in the direction of the part. This technique works effectively across various hair lengths and densities.
Braids or twists can be incorporated for added texture without compromising professionalism. We apply gel section by section to ensure even coverage and smooth finish. The asymmetrical nature of this style flatters different face shapes and provides versatility in our styling rotation.
Edge control becomes crucial for achieving crisp parting lines. We use a fine tooth comb to create precise separation and apply gel along the part for lasting hold. This attention to detail elevates the overall polished appearance.
Polished Headband Effects
Headband effects combine functionality with fashion for quick professional styling. We slick hair back using gel and position a decorative headband to frame our face and hairline. This approach emphasizes neatness while adding a stylish accent to our look.
Decorative headbands serve dual purposes as both functional tools and fashionable accessories. We choose styles that complement our professional wardrobe and workplace culture. The headband helps control any shorter pieces while creating visual interest.
Application involves smoothing gel through hair in an upward and backward motion. We ensure the hairline appears neat and defined before placing the headband. This style works particularly well for busy mornings when we need elegant results with minimal time investment.

Creative Updos Using Gel as Foundation

Building on our foundation of gel techniques, we’re now exploring elegant updos that showcase the versatility of gel styling. These sophisticated styles transform your hair into stunning statement pieces perfect for special occasions.
Braided Crown with Gel Security
Braided crowns create a regal appearance that’s both timeless and elegant for Black women’s hair. We start by sectioning the hair around the hairline and applying strong hold gel to each section before braiding. The gel acts as a protective barrier while maintaining the sleek appearance of each braid.
Working from ear to ear, we create a Dutch braid that follows the natural hairline curve. This technique is particularly effective for Afro textured hair, which can be fragile and prone to breakage without proper product support. The gel security ensures your braided crown stays intact throughout the day without causing tension or damage to delicate edges.
Finishing touches include smoothing any flyaways with a small amount of gel on a fine tooth comb. We recommend securing the braid ends with clear elastic bands and tucking them discretely behind the ears for a polished finish.
Twisted Halo Styles
Twisted halo styles offer a romantic variation of the classic crown braid with added dimension and texture. We begin by creating horizontal sections from temple to temple, applying gel to maintain smooth twisted sections. Each section gets twisted away from the face before wrapping around the head in a halo formation.
The key to successful twisted halos lies in consistent tension and even gel distribution throughout each twist. We focus on keeping the twists uniform in size and spacing to create a balanced, symmetrical look. Gel helps eliminate frizz while adding natural shine to the twisted sections.
Securing the halo involves pinning each twisted section in place with bobby pins that match your hair color. We complete the style by gently tugging at the twists to create volume and texture, then setting everything with a light mist of setting spray.
Sculptural High Buns
Sculptural high buns represent the pinnacle of gel styling artistry, creating dramatic height and geometric shapes. We start with damp hair and apply gel from roots to ends, ensuring complete coverage for maximum hold and control. The hair gets gathered at the crown and twisted into a tight coil before wrapping into the desired bun shape.
These architectural styles require strong hold gel to maintain their striking silhouettes throughout extended wear. We use bobby pins strategically placed around the bun’s base to provide additional security without compromising the clean lines. The gel prevents stray hairs from escaping while maintaining the bun’s precise shape.
Creative variations include asymmetrical buns, braided bun bases, and textured surface treatments using gel application techniques. We often incorporate hair accessories like decorative pins or silk scarves to enhance the sculptural element while maintaining the style’s sophisticated appeal.
Gel Application Techniques for Maximum Hold

We’ll share proven strategies that transform your gel application from basic to professional. These methods ensure your styles maintain their crisp appearance throughout the day.
Proper Product Distribution Methods
Sectioning transforms gel application into precise artistry. We recommend dividing your hair into manageable portions before beginning the styling process. Work with small amounts of gel at a time, starting from the roots and moving outward to ensure complete coverage without creating buildup or flaking.
Apply gel in circular motions along your hairline for edges. This technique follows the natural contours of your face while creating smooth, defined borders. For ponytail bases and laid sections, use straight brushing motions that press the product directly into the hair shaft.
Distribution becomes more effective on slightly damp hair. We suggest misting your hair lightly before gel application, as this allows the product to spread more evenly and creates better adherence. Clean hair provides the best foundation for maximum hold without competing with oils or previous styling products.
Layering Techniques for All-Day Wear
Begin with a lightweight leave-in conditioner as your base layer. This foundation protects your hair while providing the moisture needed for healthy styling. Apply this product to damp hair, focusing on the mid-lengths and ends rather than the roots.
Follow with a thin coat of edge control gel for initial hold. We recommend using a product specifically designed for edges, as these formulas provide targeted control without excessive weight. Allow this layer to dry partially before proceeding to the next step.
Top with a stronger hold gel for areas requiring extra control. Focus this final layer on your hairline, ponytail base, or any sections that need maximum staying power. Allow each layer to set slightly before adding the next to prevent stickiness and maintain the style’s integrity throughout the day.
Tools and Accessories for Best Results
A firm-bristle brush becomes your precision styling tool. We prefer brushes with natural bristles for their ability to grip hair effectively while distributing gel evenly. Small toothbrushes work exceptionally well for detailed edge work and creating intricate patterns.
Satin scarves and caps protect your finished style overnight. These accessories maintain the sleek appearance of your gel hairstyles while preventing friction that can cause frizz or flaking. Wrap your edges gently before securing the scarf around your hairline.
Wide-tooth combs help with sectioning and detangling before styling. Use these tools to prepare your hair for gel application, ensuring you don’t encounter snags or tangles during the styling process. Quality hair ties and decorative accessories complete your look while providing secure hold for ponytails and buns.

Maintaining Gel Hairstyles Between Washes

We’ve perfected the art of creating stunning gel hairstyles, but keeping them fresh between wash days requires strategic care. Our gel styles can last multiple days when we follow proven maintenance techniques that preserve both the look and hair health.
Nighttime Protection Strategies
Satin or silk accessories become our best friends when protecting gel hairstyles overnight. We should wrap our hair with a satin scarf or slip on a silk bonnet before bed to minimize friction and prevent moisture loss.
Creating a loose pineapple or ponytail helps maintain our style’s shape while we sleep. We position the elastic high on our crown without pulling tight, as harsh tension can create unwanted creases or cause breakage.
Avoiding tight clips and elastics prevents those dreaded morning dents in our carefully crafted styles. Instead, we use gentle hair ties or soft scrunchies that won’t leave marks on our gel-set hair.
Securing our edges with extra care means lightly misting them with water before applying our protective covering. This technique keeps our baby hairs intact and ready to style the next morning.
Refresh Methods for Day Two Hair
Light misting with water brings life back to flattened or slightly frizzy sections of our gel styles. We use a spray bottle to lightly dampen areas that need refreshing, being careful not to oversaturate.
Smoothing with gentle pressure helps eliminate any frizz or kinks that developed overnight. We use our fingers or a soft bristle brush to gently smooth problem areas, working in the direction of our original style.
Applying targeted gel touch ups addresses exact sections that need extra hold. We use small amounts of our go-to gel only where necessary, focusing on edges or areas that lost their definition.
Creating a water and gel mixture provides the perfect consistency for day two refreshing. We mix equal parts water and gel in a spray bottle, shake well, and apply sparingly to maintain our style without creating buildup.
Preventing Flaking and Buildup
Starting with clean, damp hair prevents most flaking issues before they begin. We always apply gel to freshly washed hair that’s been gently towel dried, as product adheres better to clean strands.
Distributing gel evenly throughout each section ensures smooth application without thick, flaky spots. We work the product through small sections using our fingers or a wide tooth comb for consistent coverage.
Using the right amount of product means less is often more when it comes to preventing flakes. We start with a small amount and add more as needed, rather than applying too much gel at once.
Regular cleansing with gentle shampoo removes product buildup that can cause flaking and scalp irritation. We schedule wash days based on our hair’s needs, typically every 7-10 days for protective gel styles.
Adding water during application helps thin out thick gel formulas that might otherwise create flakes. We lightly mist our hair or add drops of water to our gel for smoother, more manageable application.
Conclusion
Mastering gel hairstyles opens up a industry of styling possibilities that celebrate the beauty and versatility of Black hair. From protective styles that promote healthy growth to professional looks that command respect we’ve covered techniques that work for every lifestyle and occasion.
The key to success lies in understanding your hair’s unique needs and applying these methods with patience and practice. Whether you’re creating intricate edge designs or maintaining styles between washes these techniques will help you achieve consistently stunning results.
We encourage you to experiment with different approaches and find what works best for your hair texture and daily routine. With the right tools products and techniques you’ll discover that gel isn’t just a styling product—it’s your gateway to endless creative expression and hair confidence.
Frequently Asked Questions
What types of gel hairstyles work best for Black women’s hair?
Gel works excellently for various styles including sleek ponytails, protective styles like twist-outs and Bantu knots, wash-and-go looks, professional updos, and edge control designs. The key is choosing the right gel strength for your desired style and hair texture, from lightweight formulas for natural curls to strong-hold options for sculptural updos.
How do I prevent gel from flaking in my hair?
Start with clean, damp hair and distribute gel evenly using sectioning techniques. Use the right amount of product – not too much or too little. Apply gel with circular motions and add water during application if needed. Regular cleansing between styles also prevents buildup that leads to flaking.
Can gel be used on natural 4C hair textures?
Yes, gel works wonderfully on 4C hair. Apply gel to soaking wet hair using the praying hands method, then scrunch to encourage coil formation. This technique helps define natural texture while providing hold for wash-and-go styles and protective looks without causing damage or dryness.
How long do gel hairstyles typically last?
With proper application and maintenance, gel hairstyles can last 3-7 days. Use satin accessories for nighttime protection, create loose pineapples to maintain shape, and refresh with light water misting and targeted touch-ups. Professional styles like low buns may last longer with minimal manipulation.
What’s the best way to apply gel for maximum hold?
Section hair for precise application, use circular motions for edges, and apply on slightly damp hair for better adherence. Layer products starting with leave-in conditioner, then edge control gel, and finish with strong-hold gel for areas needing extra control. Use firm-bristle brushes for smooth styling.
How do I maintain gel hairstyles between washes?
Protect styles overnight with satin scarves or bonnets, sleep on satin pillowcases, and create loose protective styles like pineapples. For day-two refresh, lightly mist with water, gently smooth flyaways, and apply targeted gel touch-ups only where needed to maintain the original style.
What tools do I need for professional gel styling?
Essential tools include firm-bristle brushes for sleek styling, wide-tooth combs for sectioning, satin scarves for overnight protection, and precision tools like small brushes for intricate edge designs. Having the right tools ensures even product distribution and professional-looking results at home.
Can I create professional hairstyles with gel?
Absolutely! Gel is perfect for corporate-ready styles like sleek low buns, side-swept looks with braided details, and polished updos. Focus on crisp parting lines, smooth edges, and strong hold for styles that project confidence and maintain their shape throughout the workday.