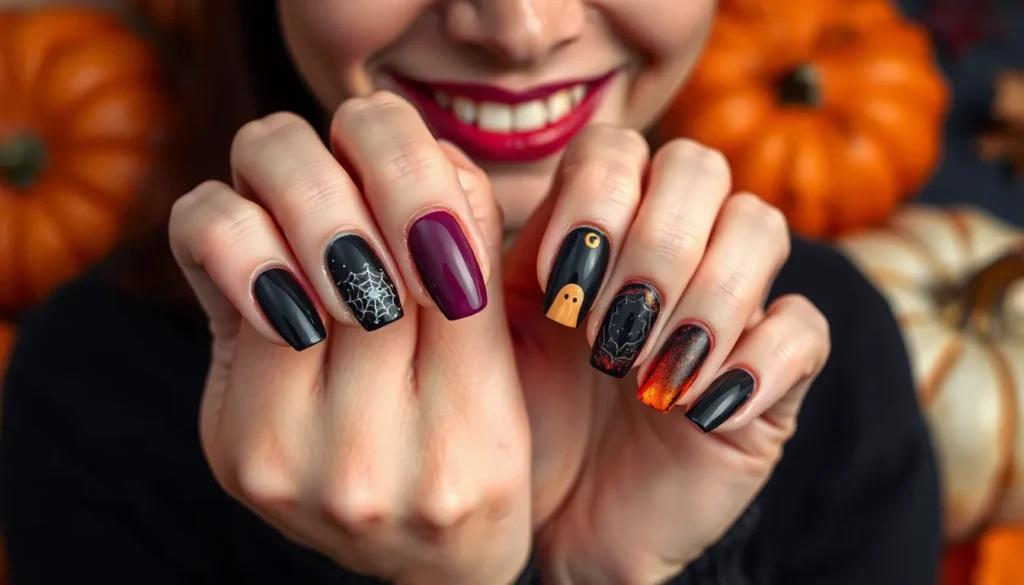
Halloween’s creeping closer and we’re already getting our spook on! While you’re planning your costume and decorating your home there’s one detail that can make or break your entire Halloween look – your nails.
We’ve all been there scrolling through endless nail art photos wondering how to transform our fingertips into the perfect Halloween accessory. Whether you’re channeling classic horror vibes or going for something more playfully spooky the right nail design can elevate your entire Halloween aesthetic.
From blood-dripping effects to intricate spider webs and everything wickedly wonderful in between we’ve gathered the most creative and achievable Halloween nail designs that’ll have everyone asking where you got them done. These aren’t just your basic orange and black combos – we’re talking about show-stopping designs that range from beginner-friendly to salon-worthy masterpieces.
Classic Halloween Spooky Nail Designs That Never Go Out of Style
These timeless nail art designs form the foundation of Halloween beauty traditions. We’ve perfected these classic looks that continue to captivate year after year.
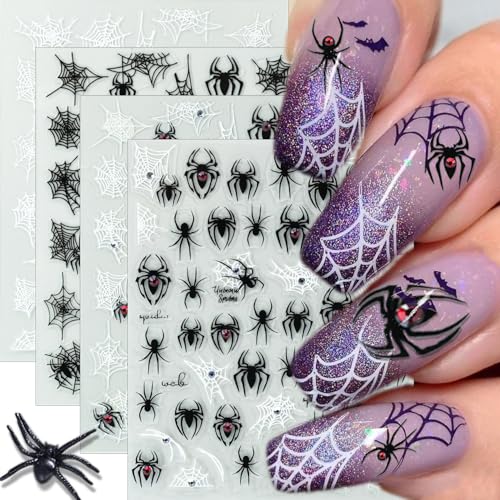
Unique Nail Sticker Set: You will get 4 sheets halloween nail art stickers for acrylic nails supply, many pattern for you to choose, spider web nail designs, and satisfy your rich imagination of nail diy

Package Include: You will get 5 sheet Halloween nail design stickers in one package. Exquisite spider web nail design decoration can provide you with a variety of choices, allowing you to easily DIY your designer nail decoration at home

【Great Value】This kit includes 2 sheets of premium nail stickers with over 100+ designs, featuring spooky spiders, intricate cobwebs, and eerie skeleton hands. Perfect for creating endless dark, gothic manicure looks for Halloween parties and everyday styling.
Traditional Orange and Black Color Schemes
Orange and black combinations create the most recognizable Halloween nail aesthetic. We recommend starting with a solid orange base on your ring and middle fingers while painting your thumb, index, and pinky fingers jet black. This alternating pattern provides visual balance without overwhelming your hands.
Gradient effects between orange and black offer a sophisticated twist on the classic combo. Apply orange polish at the nail base and gradually blend black toward the tips using a makeup sponge. The ombre transition creates depth and movement that catches light beautifully.
Striped patterns using orange and black deliver bold visual impact. Paint vertical stripes using nail art brushes or tape for clean lines. We suggest varying the stripe widths to create ever-changing compositions that draw attention to your fingertips.
Polka dots in contrasting colors add playful charm to your Halloween manicure. Use a dotting tool to create black dots on orange nails or orange dots on black backgrounds. Random placement feels more natural than perfect geometric patterns.
Pumpkin Face Nail Art Designs
Jack o’lantern faces bring instant Halloween recognition to your nails. Start with an orange base coat and use black polish to paint triangular eyes and a zigzag mouth on your accent nail. We recommend keeping the design simple with basic shapes for maximum visual impact.
Carved pumpkin expressions allow for creative personality in your nail art. Paint different facial expressions across multiple nails including winking eyes, surprised looks, or menacing grins. Each nail becomes a unique character in your Halloween story.
Pumpkin stems and vines add realistic details to your jack o’lantern designs. Use green polish to paint small stems at the top of your orange pumpkin faces. Add curling vine details using a fine brush for botanical authenticity.
Textured pumpkin surfaces create dimensional effects on your nails. Apply orange base polish and while slightly tacky, gently press a makeup sponge against the surface. This technique mimics the natural texture of pumpkin skin.
Ghost and Bat Silhouettes
White ghost shapes provide classic spooky elegance on dark backgrounds. Paint your nails black or deep purple and use white polish to create flowing ghost silhouettes. We suggest painting simple oval shapes with wavy bottom edges for authentic ghost forms.
Bat wing silhouettes create dramatic Halloween nail art with minimal effort. Use black polish on nude or gray bases to paint simple bat shapes. Focus on the distinctive wing spread and small body proportions that make bats instantly recognizable.
Flying bat patterns across multiple nails tell a cohesive Halloween story. Paint bats in different sizes and positions to suggest movement and depth. Some bats should appear closer while others fade into the background for realistic perspective.
Glowing ghost effects add supernatural charm to traditional ghost designs. Apply white ghost shapes over black bases and use glow in the dark top coat for eerie nighttime effects. The phosphorescent finish creates authentic haunted house ambiance.
Creepy Creature Nail Art Ideas for Maximum Scare Factor

Take your Halloween manicure to the next level with nail art featuring the most spine-chilling creatures of the season. These designs incorporate spiders, bats, ghosts, and skeletons to create maximum scare factor that’ll have everyone doing double takes.

Package Contains:You will receive 24 Pcs Halloween fake nails,1 nail file,1 small wooden stick,and 24pcs jelly glue stickers.The almond press on nails are divided into 12 different sizes,It is convenient for you to choose the press on nails medium that suit your nail

【Nail Art Stickers Set】- Each box comes with 20 gel nail strips in 10 different sizes for the perfect match. It also comes with 2 prep pads, 1 nail file, and 1 wooden stick.

REALISTIC TEXTURE BLOOD:Our stage blood sangre falsa like sticky jelly,it is thick,doesn't fade,the same viscosity as real blood.Perfect for hyperrealistic fresh wound FX,small cut,slit throat,realistic slit-wrist blood,right for oozing injuries.A great combination with MEICOLY scar wax
Spider Web Nail Designs with 3D Spiders
Spider web nails represent one of Halloween’s most iconic looks that never goes out of style. Create these classic designs by painting black or white web patterns over contrasting backgrounds like muted nudes, vibrant oranges, or deep purples. Modern twists on this design include French tip spider webs or negative space web patterns for a contemporary edge.
Add 3D spiders made from nail art accessories to transform your web designs into realistic crawling nightmares. Position these dimensional spiders strategically on your webs to create the illusion they’re actually moving across your nails. Professional nail artists recommend using acrylic or gel polish as your base to ensure these 3D elements stay secure throughout your Halloween festivities.
Witch Hat and Broomstick Motifs
Witch themed nails channel magical Halloween energy through enchanting motifs like tiny witch hats, broomsticks, cauldrons, and mystical symbols. Paint these designs over darker, moody colors such as black, purple, or deep forest green to capture that authentic witchy vibe. Focus on creating one accent nail per hand featuring your chosen witch motif while keeping the remaining nails in coordinating solid colors.
Incorporate glitter or metallic strokes to imitate enchanted effects and add that supernatural sparkle witches are known for. These magical touches make your witch inspired manicure eye catching while celebrating Halloween’s mystical side. Consider adding small rhinestones or studs to represent magical stars or moon phases for extra witchy appeal.
Black Cat Silhouettes and Yellow Eyes
Black cat nails capture the mysterious and eerie symbolism these felines hold in Halloween folklore. Create sleek black cat silhouettes with piercing yellow eyes against contrasting backgrounds like orange, purple, or black glitter bases. These designs work beautifully as accent nails paired with solid coordinating colors on your remaining fingers.
Design options range from minimalist silhouettes for subtle spookiness to detailed, cartoonish depictions that add whimsical charm to your Halloween look. Use small dotting tools or fine brushes to create those signature glowing yellow eyes that make black cats so captivating. Professional tip: seal your design with a high quality top coat to ensure those yellow eyes stay bright and your silhouettes remain crisp throughout the Halloween season.
Gothic Halloween Nail Designs for Dark Aesthetic Lovers

For those who embrace darkness and mystery, gothic Halloween nail designs offer the perfect blend of elegance and edge. These sophisticated spooky styles elevate your Halloween look with dramatic flair.

Quantity:You will get 1 Sheet Halloween nail art stickers decals for nail art, scary black jack-o-lantern grimace nail stickers, 3D self adhesive nail design which can offer you multiple choices, meet your Halloween nail decoration needs

Perfectly Sized Stickers: Unleash Halloween fun with our 3.7" x 3.7" ghost emoji stickers! This versatile square size fits most pumpkins beautifully and works seamlessly with our decorating kits for spine-tingling Halloween displays.

Pumpkin Decorating Stickers Kit: This Halloween decorating kit includes 15 sheets of pumpkin face stickers(each measuring 8.3" x 11.8"), each featuring 6 different Jack-O'-Lantern designs (3.8" x 3.8"). With 90 fun faces in total, kids and adults can create endless spooky or silly expressions—no carving required
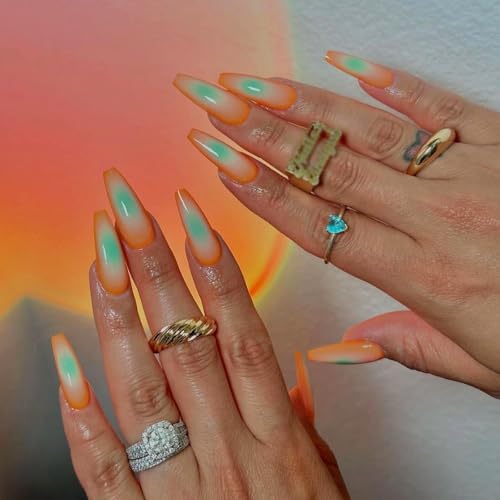
Deep Purple and Black Ombre Effects
Deep purple and black ombre effects create a mesmerizing gradient that captures the essence of midnight mystique. We love how this popular choice blends rich purple tones seamlessly into inky black, creating depth and dimension on your nails. Chrome or sparkly topcoats add an extra layer of drama, transforming your nails into jewel-like accessories.
Both short and long nails showcase this moody design beautifully, making it versatile for any nail length preference. The mystical vibe works perfectly for Halloween night, giving you that enchanting gothic aesthetic without being too over the top. We recommend starting with the lightest purple shade at the cuticle and gradually building to deep black at the tips for the most striking effect.
Skull and Crossbones Nail Art
Skull and crossbones nail art brings authentic Halloween spirit to your fingertips with classic gothic imagery. We suggest painting your base in rich black or chrome black to make the skeletal motifs pop dramatically. Stickers offer an easy application method for beginners, while hand-painted details allow for more personalized artistic expression.
This design strikes the perfect balance between spooky and classy, giving you that eerie edge without sacrificing sophistication. Black bases work exceptionally well, but don’t be afraid to experiment with deep burgundy or midnight blue for a unique twist. The key lies in ensuring your skull details are crisp and well-defined against your chosen background color.
Victorian Gothic Lace Patterns
Victorian gothic lace patterns add an elegant vintage element that transforms your nails into works of art. We find that intricate black lace designs inspired by Victorian fashion create the most stunning mysterious and sophisticated looks. These delicate patterns work beautifully over both matte and glossy black bases, giving you flexibility in your finish choice.
The vintage dark aesthetic element brings a touch of old-industry romance to your Halloween ensemble. We recommend using fine-tipped brushes or nail stamps to achieve the most detailed lacework patterns. Pair these designs with dark lipstick and dramatic eye makeup to complete your gothic Victorian inspired look.
Movie-Inspired Spooky Nail Designs for Horror Fans

Horror cinema provides endless inspiration for creating terrifying nail art that captures the essence of our favorite frightening films. These cinematic nail designs transform fingertips into miniature horror masterpieces using iconic themes and characters from the big screen.

No Cracking or Peeling:Our custom-designed acrylic press on nails cute are tougher than the rest! Built with extra strength, these strong acrylic nails press on resist cracking and peeling, lasting longer than typical false nails glue on

【Package Contents】 You will get 24 pcs long square press on nails (with 12 different sizes) and 1 nail glue. You can choose the most suitable fake nails for yourself according to the size and width of your nails.

Almond Press on Nails: There are 24 orange almond acrylic nails in one pack,Beautiful and fashion press on nails Meidum false nails comes with has 12 different sizes. Brush the nail with a coat of polish if you want it to last longer
Zombie-Themed Bloody Nail Art
Zombie nails embrace the undead aesthetic with muted greens, grays, and bloody reds that mimic decaying flesh. We recommend starting with a gray or pale green base to create that corpse-like appearance, then adding blood drips using deep red polish for maximum gore factor. Acrylic nails work best for these designs since they provide the perfect canvas for dimensional horror effects like dripping blood or torn flesh textures.
Realistic zombie faces painted on accent nails add an extra frightening touch to your manicure. Consider incorporating exposed bone details using white polish or adding textured elements that simulate rotting skin. Blood splatter effects across multiple nails create a cohesive undead look that’s perfect for Halloween acrylic nails, allowing those vivid blood-drip effects to truly stand out.
Vampire Fang and Blood Drip Effects
Vampire-inspired nails channel the classic elegance of bloodsucking creatures with sharp fang designs and mesmerizing blood drip effects. Sharp nail shapes like stiletto or coffin work perfectly for mimicking vampire fangs, especially when painted with blood red tips that resemble fresh vampire bites. Classic color combinations include blood red, black, and white for that timeless vampire aesthetic.
3D acrylic gel creates the most realistic blood drip illusions, making it appear as though fresh blood is actually dripping from your fingertips. Popular vampire nail designs feature red French tips that look like blood-stained fangs or tiny painted vampire silhouettes with dramatic dripping blood accents. We love adding metallic silver or gold accents to represent crosses or gothic jewelry for an extra vampire hunter twist.
Haunted House Industry Designs
Haunted house nails transform your fingertips into spooky miniature landscapes complete with creepy architecture and eerie atmospheres. These detailed designs work best on longer nails or acrylics since they provide enough canvas space for intricate haunted scenes. Dark blue or black backgrounds simulate nighttime settings, while silhouettes of creepy houses, bare trees, and full moons create that perfect haunted atmosphere.
Bats flying across moonlit skies add movement to these industry designs, while spider webs in house corners enhance the abandoned feeling. Adding elements like ghosts floating around the haunted structures or mysterious fog rolling across the ground creates depth and storytelling within each nail. We suggest using fine detail brushes to paint window lights that flicker ominously or adding tiny cemetery gates for extra spookiness that captures the essence of classic horror films.
Easy DIY Spooky Nail Designs for Beginners

Creating your first Halloween nail art doesn’t require professional skills or expensive tools. We’ll guide you through three beginner-friendly designs that deliver maximum spookiness with minimal effort.

[Package Content]: You will get 1 sheet of cute nail stickers. There are a lot of different cute patterns in each sticker, providing you with a variety of choices to meet your rich imagination of nail DIY.

Halloween Skull Nail Art Stickers Nail Stickers - You will get 3 sheet of Halloween nail stickers for acrylic nails, there are a variety of patterns for you to choose, fashionable and elegant design, satisfying your rich imagination of nail DIY.

Halloween Nail Art: You will get 2sheets of cute Halloween theme nail art stickers, which can add a strong fashion atmosphere. Perfect for women and girls, exquisite nail design, DIY fashion nail decoration.
Simple Ghost Faces with White Polish
Starting with a white polish base creates the perfect ghostly foundation for this adorable spooky design. Apply two coats of white polish to ensure complete coverage and let dry completely. Using a dotting tool dipped in black polish, place two oval shapes for the eyes, then add smaller dots inside for pupils.
Drawing the ghost features requires just a thin brush and steady hand. Create an upside-down heart shape above the eyes for the nose, then paint curved lines with small vertical strokes for the mouth. This technique mimics classic ghost and skull faces while remaining cute rather than terrifying.
Sealing your ghost design with a quality top coat ensures longevity. The white base shows fingerprints easily, so protection becomes essential for maintaining that pristine ghostly appearance throughout your Halloween festivities.
Basic Spider Web Using Striping Tape
Black polish serves as the dramatic backdrop for intricate-looking spider webs. Paint all nails with two coats of black polish and allow complete drying before proceeding with the web design. Rushing this step leads to smudged lines and frustrated attempts.
Creating the web pattern involves simple diagonal lines radiating from one corner. Use a thin white polish with a striping brush to paint three diagonal lines extending outward. Connect these lines with small curved sections between each division to form the classic web pattern.
Correcting mistakes becomes easy with matching polish colors nearby. Keep both black and white polish accessible during application. Any wobbly lines can be fixed by carefully painting over errors with the appropriate color.
Finishing with a top coat preserves these delicate web details. The thin white lines need protection from daily wear, and a quality top coat prevents chipping while maintaining the sharp contrast between black and white.
Gradient Sunset Cemetery Silhouettes
Blending orange, pink, and purple hues creates a stunning sunset backdrop for spooky silhouettes. Use a makeup sponge to dab and blend these colors from cuticle to tip, creating a seamless gradient effect. Work quickly while the polish remains workable for smooth transitions.
Painting cemetery silhouettes requires patience and a fine detail brush. Once the gradient background dries completely, use black polish to carefully paint gravestones, bare tree branches, and flying bats. These silhouettes don’t need perfect symmetry since cemetery scenes naturally appear organic and varied.
Building layers adds depth to your cemetery industry design. Paint larger elements like trees first, then add smaller details like gravestones and bats. This layering technique creates visual interest and prevents overcrowding on the small nail canvas.
Sealing the entire design protects both gradient and silhouette work. Apply top coat carefully to avoid disturbing the delicate black details while ensuring the colorful gradient maintains its vibrancy throughout Halloween season.
Advanced 3D Halloween Nail Art Techniques

We’re taking Halloween nail art to the next level with these sophisticated 3D techniques that create stunning textured effects. These methods require some sculpting experience but deliver professional-looking results that’ll make your nails the centerpiece of any Halloween look.

Halloween Manicure DIY: Fashionable spider web nail art sticker design, each sticker has a different style pattern, satisfying your rich imagination of nail DIY, and easily creating your own exclusive nail art

Spider Stickers for Nails Kit: You will get 4 sheets 5d spider Halloween nail stickers for nail art. Each pattern has a unique art design, attractive and creative, can add a strong holiday atmosphere.Perfect for women girls, DIY salon nail design, creates cute nail decorations.

Unique Nail Sticker Set: You will receive 8 sheets halloween cute ghost nail art stickers, different patterns are available for you to use and replace in your daily life, satisfying your rich imagination for nail DIY and bringing you different moods
Sculpted Pumpkin and Corn Decorations
Building miniature pumpkins on your nails starts with layering acrylic to create raised, round shapes that mimic real gourds. We sculpt each pumpkin by gradually building up the acrylic material, creating natural curves and ridges that catch light beautifully. Crafting corn kernels involves similar techniques, where we texture the surface to replicate the bumpy, organic feel of actual corn. The dimensional quality of these decorations gives nails a tactile element that traditional painted designs simply can’t match.
Shaping realistic details like pumpkin stems and corn husks adds authenticity to these 3D elements. We attach thin acrylic pieces to create stems that appear to grow naturally from the pumpkin base. Creating texture variations through different acrylic application techniques helps distinguish between smooth pumpkin surfaces and rough corn textures.
Raised Spider and Web Applications
Sculpting tiny spiders with acrylic or gel creates creatures that appear to crawl across your nail surface with lifelike realism. We build each spider’s body and legs separately, ensuring proper proportions and natural positioning. Constructing web patterns using raised gel gives the illusion of actual spider webs stretched across your nails.
Incorporating glow in the dark materials transforms these designs into haunting focal points that shine in low light conditions. We apply special phosphorescent powders to spider bodies and web strands for maximum spooky impact. Painting fine web details with precision brushes connects the raised elements and creates intricate patterns that draw the eye.
Adding dimensional depth through layered gel application makes webs appear to float above the nail surface. We vary the thickness of web strands to create realistic spacing and tension effects.
Textured Witch Finger Nail Extensions
Extending nails to witch finger proportions involves sculpting longer acrylic shapes that curve and twist naturally like aged fingers. We create knobby joints and wrinkled textures that simulate the bony structure of supernatural hands. Adding realistic imperfections like bumps, ridges, and irregular surfaces makes these extensions look authentically eerie.
Incorporating matte finishes over the textured surface replicates the appearance of aged, weathered skin. We often add cracked paint effects to enhance the ancient, supernatural look. Shaping pointed tips completes the witch aesthetic while maintaining wearable functionality.
Applying dark color gradients from deep purples to blacks emphasizes the supernatural theme. We blend colors seamlessly across the textured surface to create depth and shadow effects that enhance the 3D elements.
Glow-in-the-Dark Spooky Nail Designs for Night Effect

Glow-in-the-dark nail designs transform ordinary Halloween manicures into supernatural masterpieces that literally come alive when the lights go out. These luminous creations use special phosphorescent and UV-reactive technologies to create stunning effects that’ll make your nails the center of attention at any Halloween gathering.

【Nail Art Stickers Set】- Each box comes with 20 gel nail strips in 10 different sizes for the perfect match. It also comes with 2 prep pads, 1 nail file, and 1 wooden stick.

BLOOD RED MAGNETIC NAIL POLISH - Like a fire burning from within, Poison’s blood-red base is consumed by an intense red-to-orange magnetic pigment. An added dusting of glowing red shimmer heightens the magnetic pigments for an ominous transformation. Once magnetized, Poison’s vibrant and flashy red pigment contracts into a concentrated stream, exposing an infinite blackened red.

ULTIMATE REALISM: Regarded as the pinnacle of realistic fake blood, Mehron Makeup Squirt Blood is the go-to choice for makeup professionals in both stage and screen productions. Its authenticity adds a new level of realism to special effects makeup. True professional grade, trusted by Hollywood and Broadway pros since 1927.
Phosphorescent Ghost and Skeleton Designs
Phosphorescent nail designs absorb light during the day and emit an ethereal glow in darkness, creating the perfect ghostly effect for Halloween festivities. Ghost silhouettes painted with phosphorescent white polish over black bases create a haunting contrast that becomes even more dramatic in dim lighting. Skeleton motifs work exceptionally well with these luminous pigments, especially when we paint delicate bone structures using phosphorescent white or eerie green shades.
Creating realistic skeleton hands requires mixing phosphorescent pigments directly into your base polish for maximum glow intensity. We recommend charging these designs under bright light for at least 10 minutes before heading into darker environments. Skull faces become particularly striking when outlined with phosphorescent polish, allowing the bone structure to glow menacingly against deep black backgrounds.
UV-Reactive Spider Web Patterns
UV-reactive polishes contain special fluorescent pigments that remain subtle in natural light but burst into vivid colors under blacklight or UV lamps. Spider web patterns painted with these reactive formulas create an almost invisible network that suddenly appears when exposed to UV lighting at parties. Delicate web designs can be enhanced with tiny UV-reactive spiders positioned strategically across each nail.
French tip variations using UV-reactive polish create sophisticated looks that maintain elegance during daylight hours while revealing their spooky secrets under blacklight. Intricate web patterns work best when applied over dark base colors, creating maximum contrast when the reactive elements illuminate. We suggest practicing these delicate patterns with striping brushes to achieve the finest web details.
Blacklight-Activated Halloween Scenes
Blacklight-activated designs combine both phosphorescent and UV-reactive elements to create complete Halloween landscapes that transform dramatically under different lighting conditions. Jack-o’-lantern faces painted with UV-reactive orange polish appear festive in daylight but glow intensely under blacklight, while their carved features remain visible through phosphorescent outlines. Full Halloween scenes can include glowing moons, eerie trees, and floating ghosts that only reveal their true spookiness in party environments.
Layering techniques become crucial when creating these complex designs, as we need to balance visibility in natural light with dramatic impact under UV exposure. Neon accent colors mixed with traditional Halloween palette create the most striking blacklight effects. Cemetery scenes featuring glowing tombstones and spectral figures offer endless creative possibilities for those wanting elaborate nail art that tells a complete spooky story.
Minimalist Halloween Nail Ideas for Subtle Spookiness

Not everyone wants dramatic Halloween nails that dominate their entire look. Sometimes we crave understated elegance that whispers spooky rather than screams it.

Halloween pumpkin face , scary jack o lantern with dripping blood and menacing eyes, ready trick or treat nights, Halloween parties, and pumpkin patch photo ops

High-Quality Press-On Nail Kit: All Glamnetic Press-On Nail Sets offer high-quality salon style and feature protective UV coating, to ensure your nails will never break or split!

Single Accent Nail with Small Halloween Motifs
Single accent nails offer the perfect balance between festive and sophisticated, featuring one nail per hand with tiny Halloween themed designs. We recommend choosing delicate motifs like miniature ghosts, bats, or pumpkins that measure less than 5mm for maximum impact. The remaining nails stay painted in complementary neutral shades such as nude, charcoal gray, or burnt orange.
This approach works exceptionally well for professional settings where bold nail art might feel inappropriate. Position your accent nail on the ring finger for traditional elegance, or choose the middle finger for a more modern twist. Small details like tiny jack o’lantern faces or silhouette bats create visual interest without overwhelming your overall aesthetic.
Negative Space Ghost Designs
Negative space techniques transform your natural nail into part of the spooky design, creating ghostly figures through strategic unpainted areas. We use white polish to outline ghost shapes while leaving the center portions completely bare, allowing your natural nail to become the ghost’s body. This method requires precise application but delivers stunning results that appear both ethereal and chic.
Start by applying a clear base coat, then carefully paint white ghost outlines using a thin brush or striping tool. The contrast between your natural nail tone and the white borders creates an almost translucent ghost effect. Add tiny black dots for eyes using a dotting tool, keeping details minimal to maintain the sophisticated aesthetic.
Delicate Spider Web Corner Details
Spider web corner accents add subtle spookiness without covering your entire nail surface, focusing intricate details only on nail tips or corners. We create these delicate webs using thin white or silver polish applied with a striping brush, drawing connected diagonal lines that radiate from one corner. The technique requires steady hands but produces elegant results that catch light beautifully.
Pair spider web corners with nude or clear base colors to maintain the minimalist aesthetic. Consider adding a single tiny rhinestone or glitter accent at the web’s center to represent a dewdrop or trapped insect. This design works particularly well on shorter nails where full coverage patterns might appear cluttered.
Color Combinations That Make Halloween Nail Designs Pop

The right color palette transforms any Halloween nail design from ordinary to extraordinary. We’ve discovered that strategic color combinations create visual impact that captures the spooky spirit while making your nails the focal point of your Halloween look.

Package Contents:You will get 24pcs medium almond press on nails (with 12 different sizes) . You can choose the most suitable fake nails for yourself according to the size and width of your nails

All-In-One Application Kit Included: You'll get 24 nails in 12 sizes. Achieve salon-quality results at home with our complete tool set—wooden stick, adhesive glue, jelly gel tabs, nail file, and cleansing wipes. No extra purchases needed
【Package Contents】 You will get 24 pcs long coffin press on nails (with 12 different sizes) and 1 nail glue. You can choose the most suitable fake nails for yourself according to the size and width of your nails.
Classic Orange, Black, and Purple Palettes
Orange serves as the foundation of Halloween nail art because it perfectly mimics the warm glow of jack-o’-lanterns. Black adds that essential spooky night atmosphere that Halloween demands. Purple brings mystical and eerie undertones that complete this iconic trio.
These three colors work together in various pattern combinations like stripes, polka dots, and traditional Halloween motifs. We recommend creating orange nails with black jack-o’-lantern faces accented by purple backgrounds for maximum seasonal impact. Alternating these colors across different nails creates a cohesive look that tells a complete Halloween story.
Blending these shades in gradient effects produces sophisticated results that move beyond basic color blocking. Checkered patterns using orange and black with purple accent details add visual complexity. Small purple stars or crescent moons on black bases with orange trim create celestial spookiness that’s both elegant and festive.
Metallic Silver and Gold Accent Colors
Silver and gold metallics add unexpected glamour to traditional Halloween nail designs while maintaining their spooky appeal. These shimmer shades create striking contrast when paired against darker base colors like deep black or rich purple.
We’ve found that silver works exceptionally well for intricate details such as spider webs, delicate fangs, or tiny twinkling stars. Gold accents bring warmth to cooler Halloween palettes and create luxurious touches on witch-themed designs. Both metals reflect light beautifully, making your nail art catch attention even in dim Halloween lighting.
Incorporating metallic French tips over black or purple bases creates sophisticated elegance. Foil accents strategically placed on key design elements like pumpkin stems or bat wings add dimension. Glitter topcoats in silver or gold transform simple Halloween motifs into dazzling statement pieces.
Neon Green and Electric Blue Combinations
Neon green delivers that perfect toxic, otherworldly vibe that modern Halloween designs crave. Electric blue creates ghostly and ethereal effects that feel both contemporary and mysteriously spooky. These vibrant shades provide fresh alternatives to traditional Halloween colors.
Combining neon green with classic black backgrounds makes monster-themed designs pop with electrifying intensity. Electric blue paired with white creates stunning ghostly apparitions that seem to glow from within. We recommend using these bold colors sparingly as accent shades to avoid overwhelming the overall design.
Alternating neon green and electric blue across different nails with black accent details creates a modern Halloween aesthetic. Ombre effects blending these electric shades into darker bases produce supernatural gradients. Strategic placement of these colors in small details like eyes, lightning bolts, or potion bubbles adds that perfect pop of unexpected color.
Tools and Supplies Needed for Perfect Spooky Nail Designs

Creating stunning Halloween nail art requires the right tools and materials to bring your spooky visions to life. We’ll break down the essential supplies that’ll help you achieve professional-looking results at home.

Halloween Nail Stickers: You will get 3 sheets skeleton nail art stickers for acrylic nails supply, many pattern for you to choose, and satisfy your rich imagination of nail DIY

Package Include: You will get 1 sheet Halloween nail design stickers in one package. Exquisite bloody nail design decoration can provide you with a variety of choices, allowing you to easily DIY your designer nail decoration at home

Halloween Nail Stickers: You will receive 4 sheets flower ghost nail decals for nail art,Large number of different patterns for you to use and replace in daily life, nail decals are full of sensuality and elegance, various charming patterns bring you a different mood
Essential Brushes and Dotting Tools
Thin nail art brushes become your best friends when creating intricate details like spider web patterns or skull features. Dotting tools in various sizes let us create perfect circles for spider bodies, ghost eyes, or pumpkin faces with precision. Detail brushes help us touch up mistakes and add fine lines that make designs pop.
Brush selection matters for achieving different effects across Halloween motifs. Fine liner brushes work perfectly for drawing skeleton bones or witch hat outlines. Small flat brushes help us blend colors smoothly for gradient zombie effects or sunset cemetery scenes.
Quality dotting tools range from 1mm to 5mm in diameter, giving us versatility for different design elements. We can create tiny spider eyes with the smallest tools or larger pumpkin features with bigger ones. Metal dotting tools maintain their shape better than plastic alternatives and provide cleaner results.
Halloween-Themed Nail Stickers and Decals
Ready-made stickers featuring pumpkins, bats, skulls, and witches simplify complex designs without sacrificing visual impact. Halloween nail decals offer instant gratification for intricate images that would take hours to paint by hand. We can layer multiple stickers to create depth or use them as focal points on accent nails.
Placement strategy transforms basic stickers into professional-looking art. Combining decals with hand-painted elements creates unique designs that look custom-made. Water transfer decals provide the most realistic appearance but require careful application to avoid air bubbles.
Seasonal variety includes everything from cute cartoon characters to realistic horror imagery. Holographic stickers add dimension and catch light beautifully under Halloween party lighting. We recommend building a collection throughout the year since Halloween supplies often sell out quickly.
Special Effect Polishes and Top Coats
Glow-in-the-dark polishes create eerie effects that shine brilliantly in darkness, perfect for ghost designs or skeleton patterns. Cat-eye gel polishes produce dimensional, shimmery effects that add sophistication to witch-themed nails. Matte and glossy top coats let us control the final texture and protect our detailed artwork.
Color essentials include black, white, orange, purple, and green as staple shades for authentic Halloween looks. Metallic silver and gold accents elevate designs from amateur to professional quality. Neon green and electric blue provide modern alternatives that photograph beautifully under party lights.
Top coat application seals our designs and prevents chipping during Halloween festivities. Quick-dry formulas save time when creating multiple accent nails or full Halloween scenes. UV-reactive polishes reveal hidden colors under blacklight, adding surprise elements to our spooky manicures.
Conclusion
We’ve explored a haunting collection of nail designs that’ll make your Halloween look absolutely unforgettable. From beginner-friendly ghost faces to advanced 3D sculptures these creative options prove that your nails can be the perfect finishing touch to any spooky ensemble.
Whether you’re drawn to classic pumpkin motifs gothic elegance or glow-in-the-dark masterpieces there’s a design that matches your Halloween vision. The key is choosing techniques that align with your skill level and available time.
Remember that the right tools and quality materials make all the difference in achieving professional-looking results at home. With these spooky nail art ideas you’re ready to create show-stopping Halloween nails that’ll have everyone asking where you got them done.
Frequently Asked Questions
What are the most popular Halloween nail design themes?
The most popular Halloween nail design themes include classic pumpkin faces with jack-o’-lantern expressions, spooky ghost and bat silhouettes, intricate spider web patterns, witch-themed designs with hats and broomsticks, and black cat silhouettes with glowing yellow eyes. Gothic themes featuring skulls, deep purple ombre effects, and Victorian lace patterns are also trending for a more sophisticated Halloween look.
Can beginners create impressive Halloween nail art at home?
Yes, beginners can definitely create impressive Halloween nail art at home. Simple designs like ghost faces using white polish, basic spider webs with striping tape, and gradient sunset cemetery silhouettes require minimal tools and skills. The key is starting with easy techniques and gradually building confidence before attempting more complex designs.
What tools do I need for DIY Halloween nail designs?
Essential tools include quality brushes for detail work, dotting tools for creating perfect circles and textures, Halloween-themed nail stickers and decals for easy application, and special effect polishes like glow-in-the-dark or UV-reactive formulas. A good top coat is crucial for sealing designs and ensuring longevity of your Halloween nail art.
How can I make my Halloween nails glow in the dark?
To create glow-in-the-dark Halloween nails, use phosphorescent polishes that charge under light and glow in darkness, or UV-reactive polishes that illuminate under blacklight. Apply multiple thin coats for maximum glow intensity, and consider combining both technologies for dynamic effects. Designs work best with ghost, skeleton, or spider web patterns.
What color combinations work best for Halloween nail art?
Classic Halloween color combinations include orange, black, and purple in stripes, polka dots, or gradient effects. Metallic silver and gold accents add glamour to any design. For a modern twist, try neon green and electric blue. Deep purples with black create sophisticated gothic looks, while traditional orange and black remain timeless choices.
Are there professional-looking Halloween nail designs for work settings?
Yes, minimalist Halloween designs are perfect for professional settings. Try single accent nails with tiny Halloween motifs, negative space ghost designs that incorporate your natural nail, or delicate spider web corner details. These subtle approaches maintain sophistication while allowing festive expression, making them workplace-appropriate yet seasonally themed.
How long do Halloween nail designs typically last?
Halloween nail designs typically last 7-14 days with proper application and care. The longevity depends on the quality of base coat, polish, and top coat used. Sealing designs with a high-quality top coat is essential for preventing chipping and fading. Avoid harsh chemicals and wear gloves when cleaning to extend wear time.
Can I create 3D effects for Halloween nail art?
Yes, 3D Halloween nail art is achievable using acrylic techniques to sculpt pumpkins, corn decorations, and raised spider applications. You can create textured witch finger extensions and realistic blood drip effects using 3D acrylic gel. These advanced techniques require practice but create stunning, professional-looking results with impressive depth and texture.